August 6, 2018
Happy Monday! I hope you all had a great weekend. This morning I’m sharing the 4 simple updates we made to completely update our laundry room to fit the modern farmhouse vibes of our home!
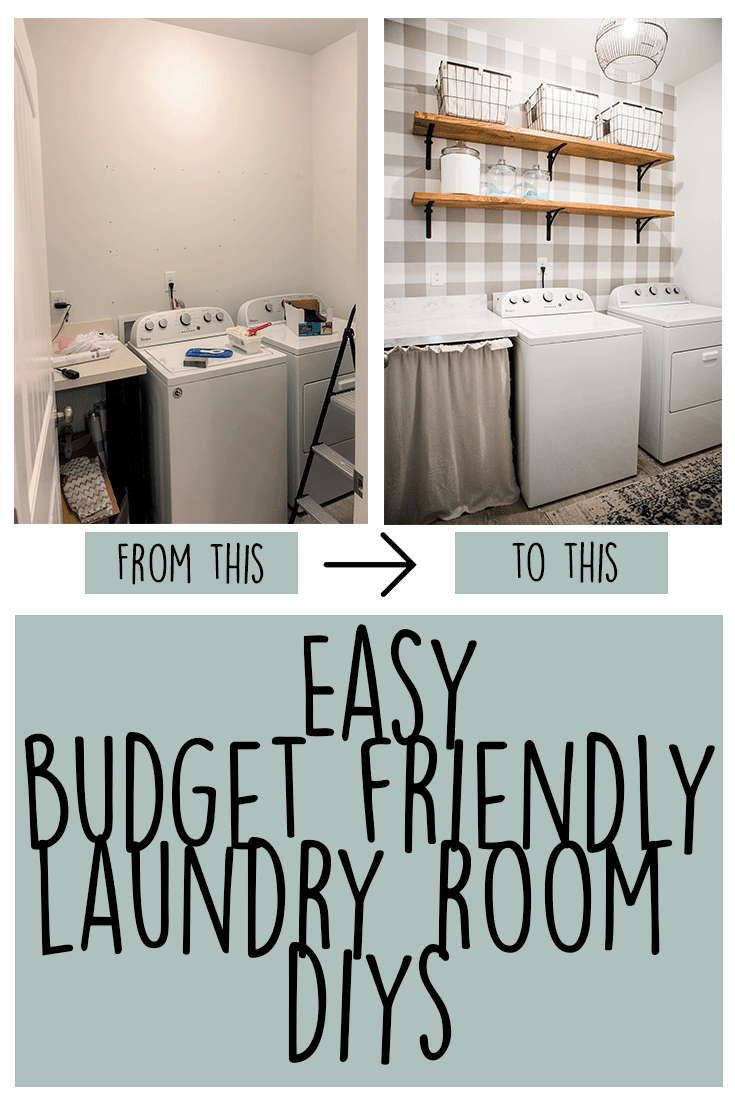
This was the first project we tackled in our new house. We knew it would only take a weekend and would make a huge difference so we decided to go for it. I shared the reveal here, but I wanted to share all of the changes we made to provide some inspiration for some of you out there! When it all comes down to it, it was only a few simple updates that made a huge difference in the space.
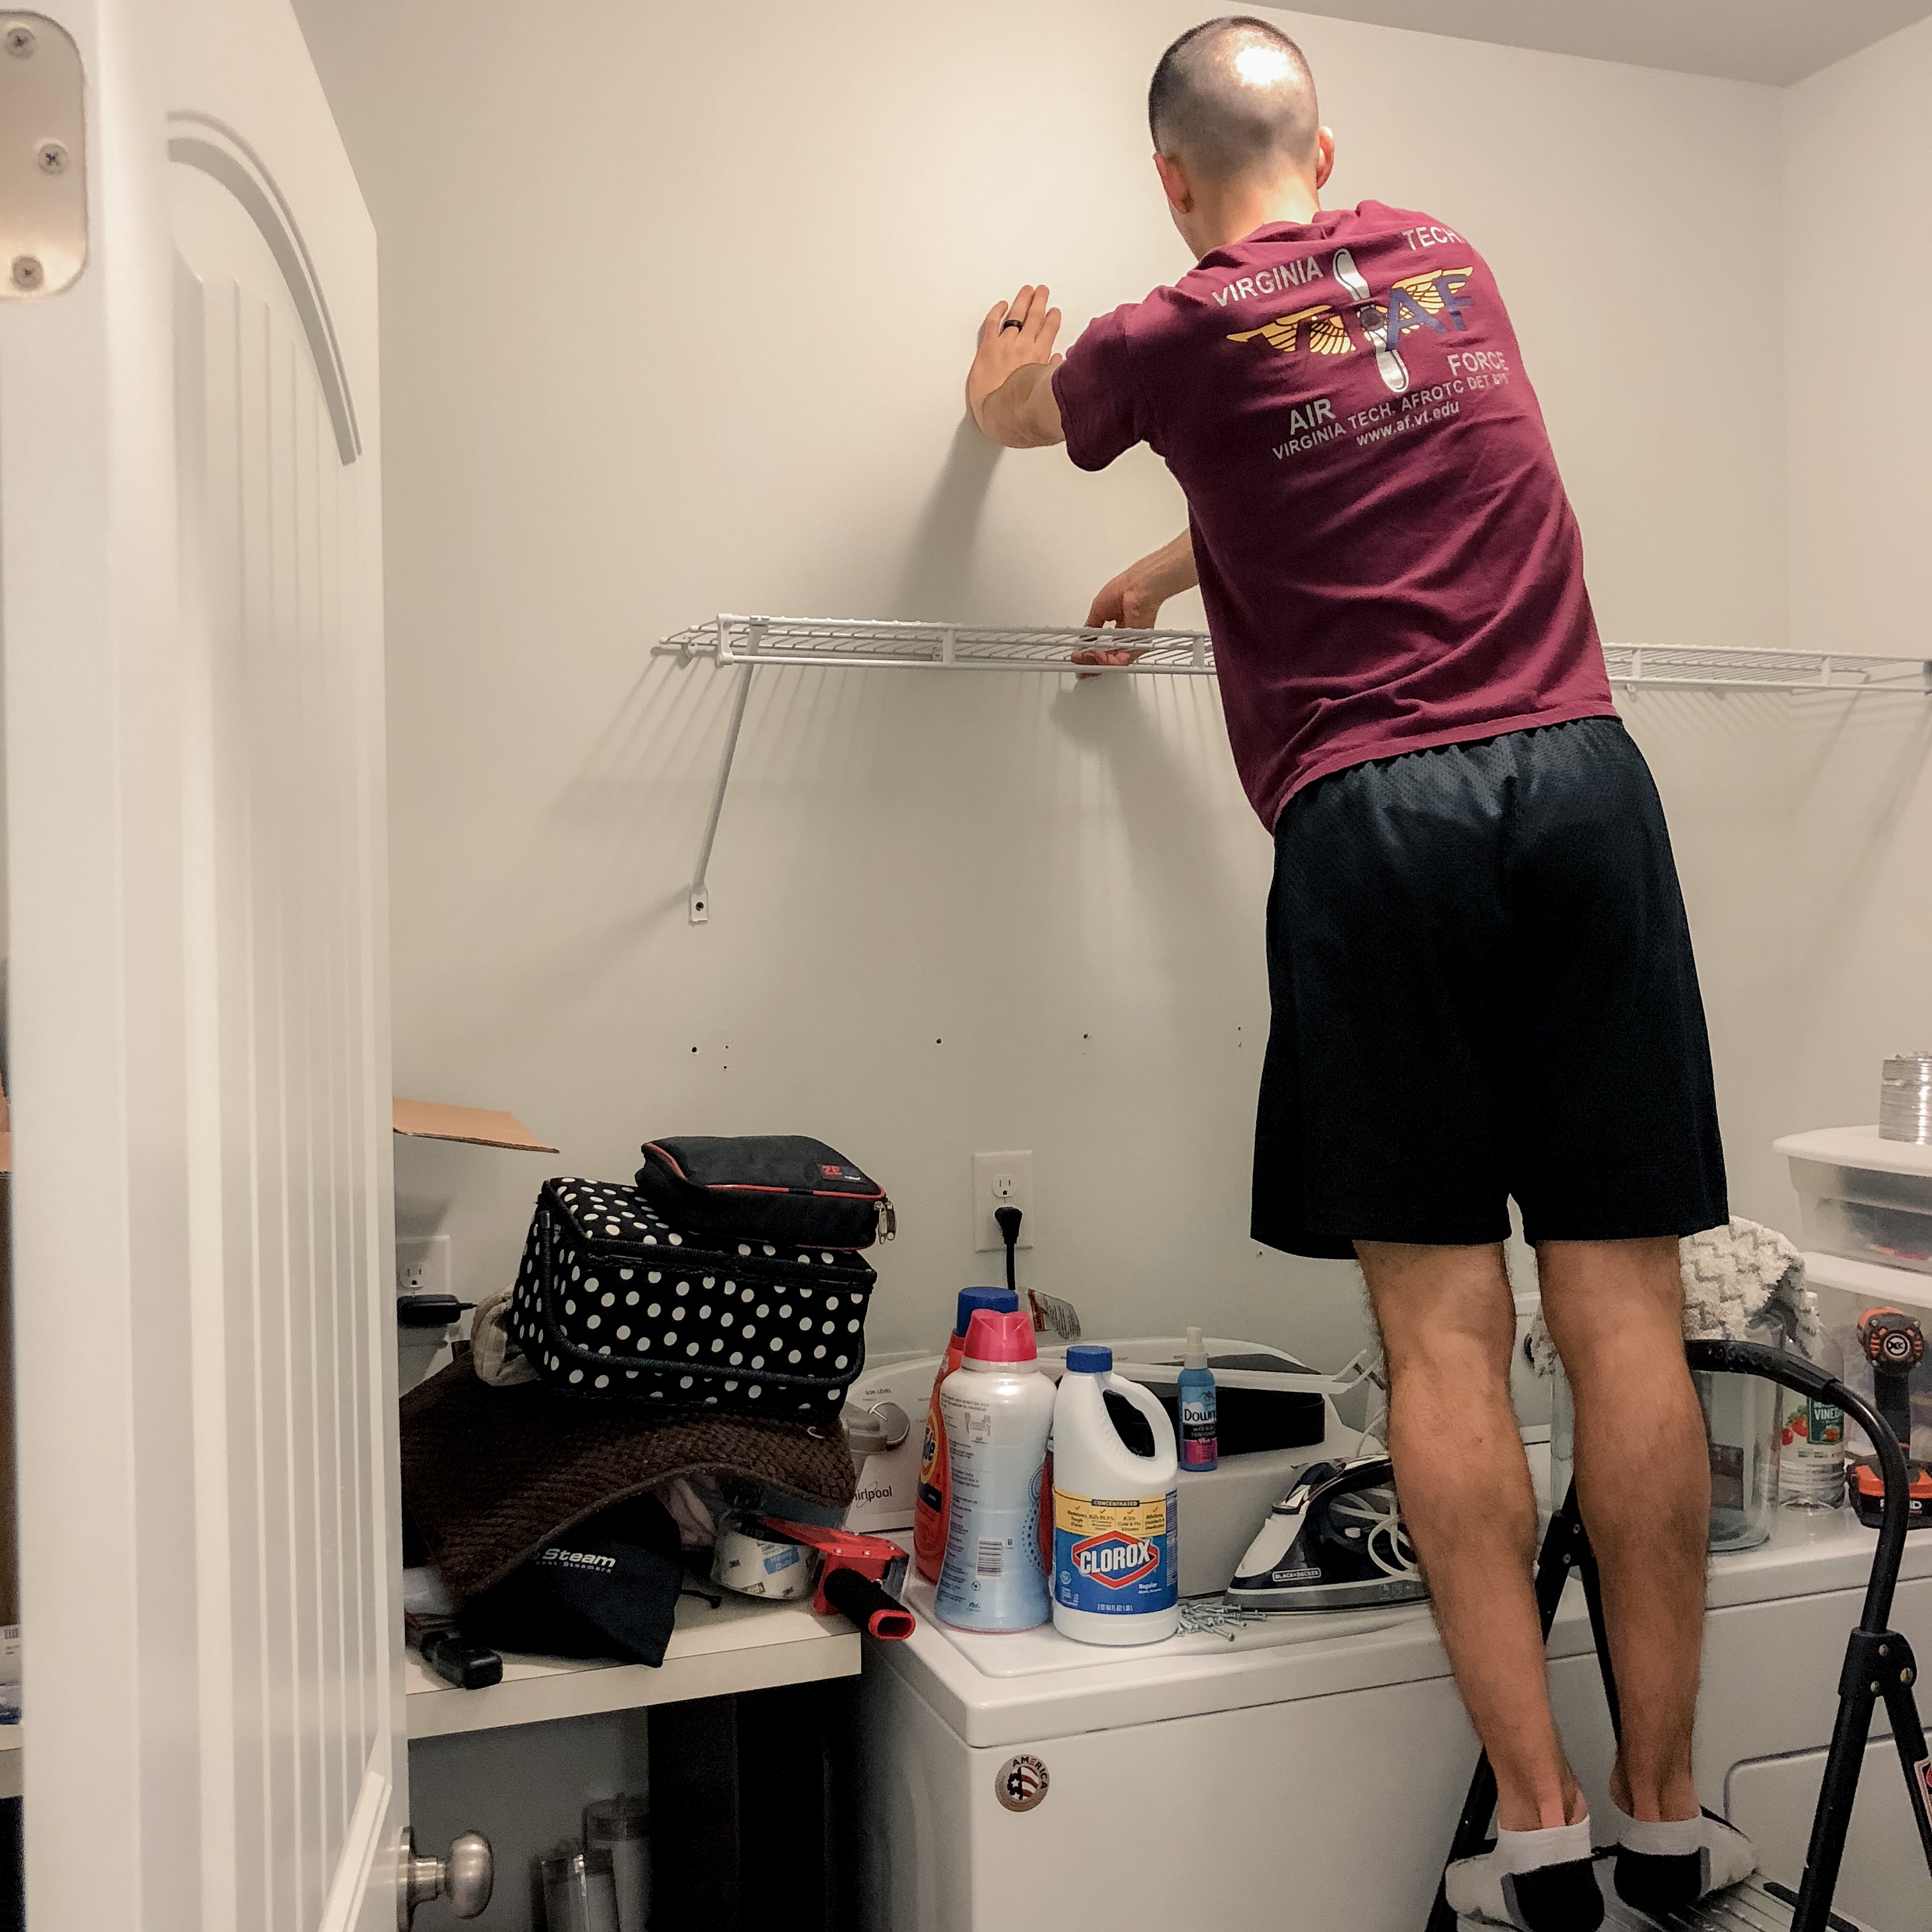
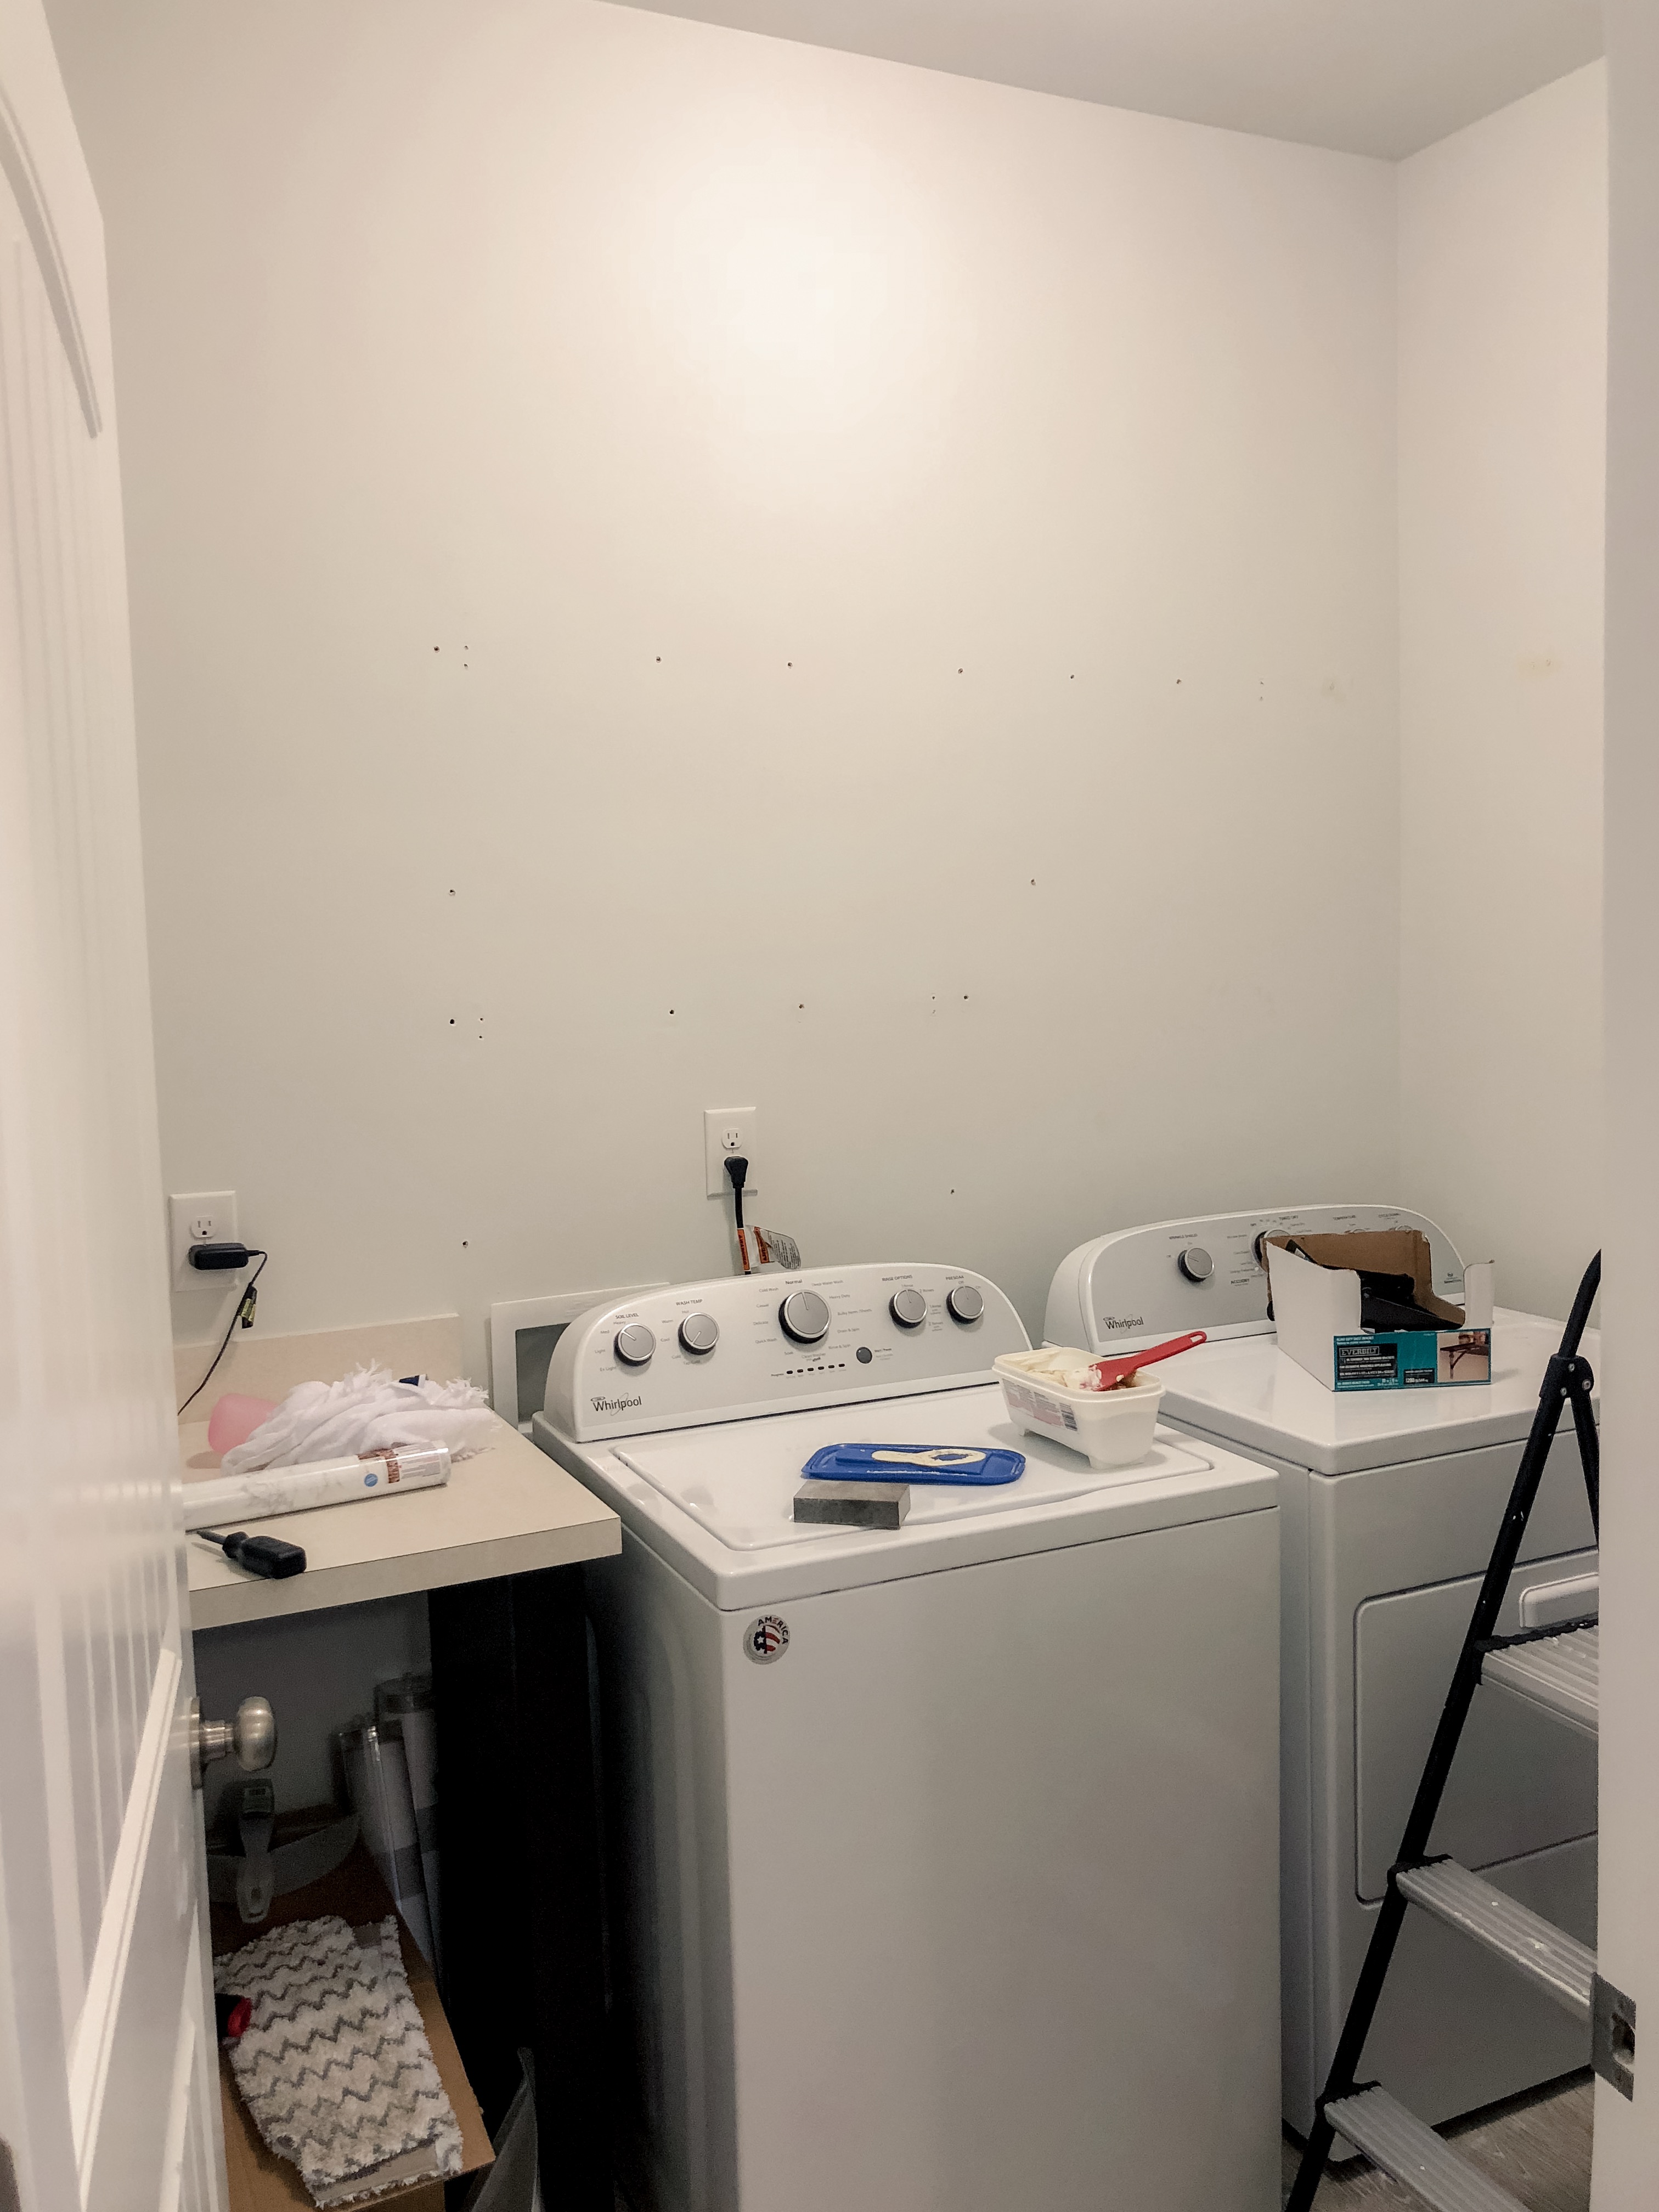
Stephen is such a champ he already had shelves removed before I got home from work so this is the only ‘before’ shot I got!
No. 1 – Wallpaper
The first thing we did in the room was install wallpaper that I purchased from Target. We ended up needing 3 rolls to cover the entire wall which made the project more expensive than we anticipated but once we started, there was no turning back. We don’t really regret the purchase, honestly. We absolutely love the way it turned out!
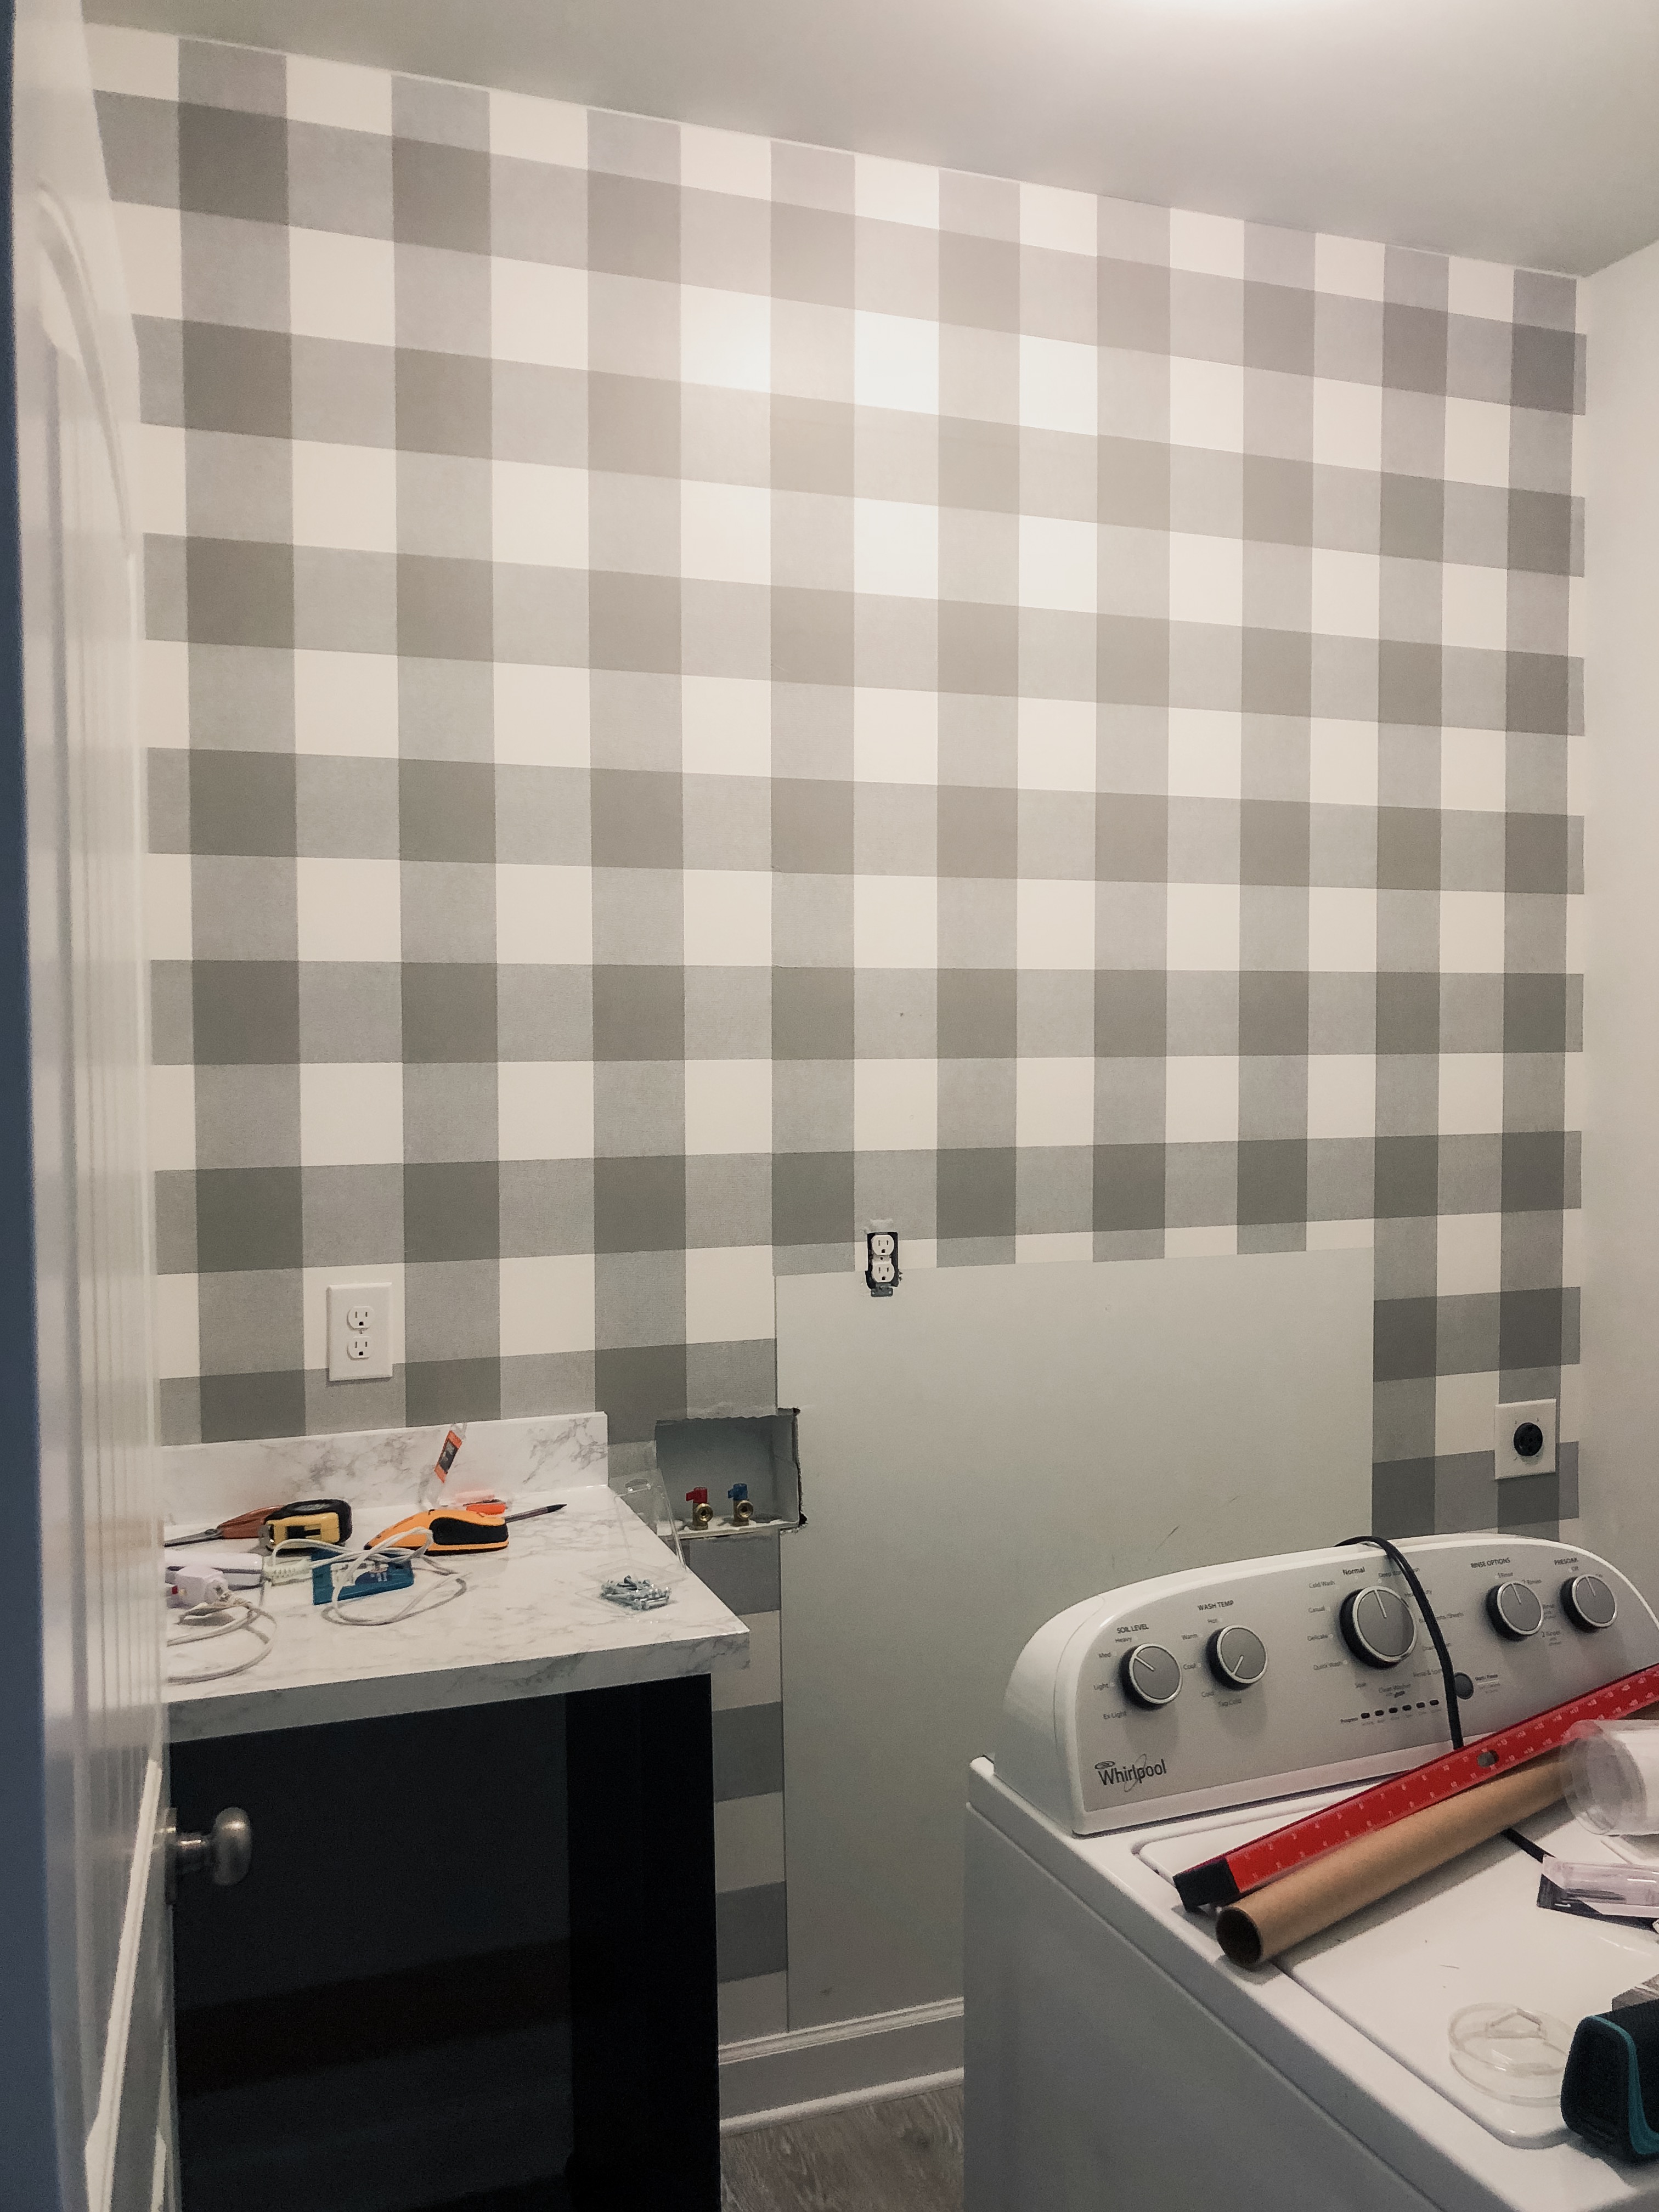
When we realized we needed a third roll…
Overall it was pretty simple to install. I would suggest taking a big dose of patience before you start though!
Here’s the wallpaper we used.
If we had done the project one week later I would’ve used this one just because I love love love watercolor. I would’ve been REALLY torn between the gray and blueish one (I have a feeling I would’ve picked blue… Maybe another space? ???? ) It seems to be a lot more expensive but it’s not much more when you break it down to cost per square foot.
No. 2 – Contact paper
When we built the house we decided not to upgrade the cabinet and countertop in the laundry room to one with a door/quartz. We thought it was stupid how much they were charging and we knew we could make it cute ourselves for much less. The countertop when we moved in was a laminate off white/tan color. It didn’t fit our style one bit. We debated on getting butcher block top or a cement top, which we still might do eventually, but for now, I came up with a much cheaper option – contact paper.
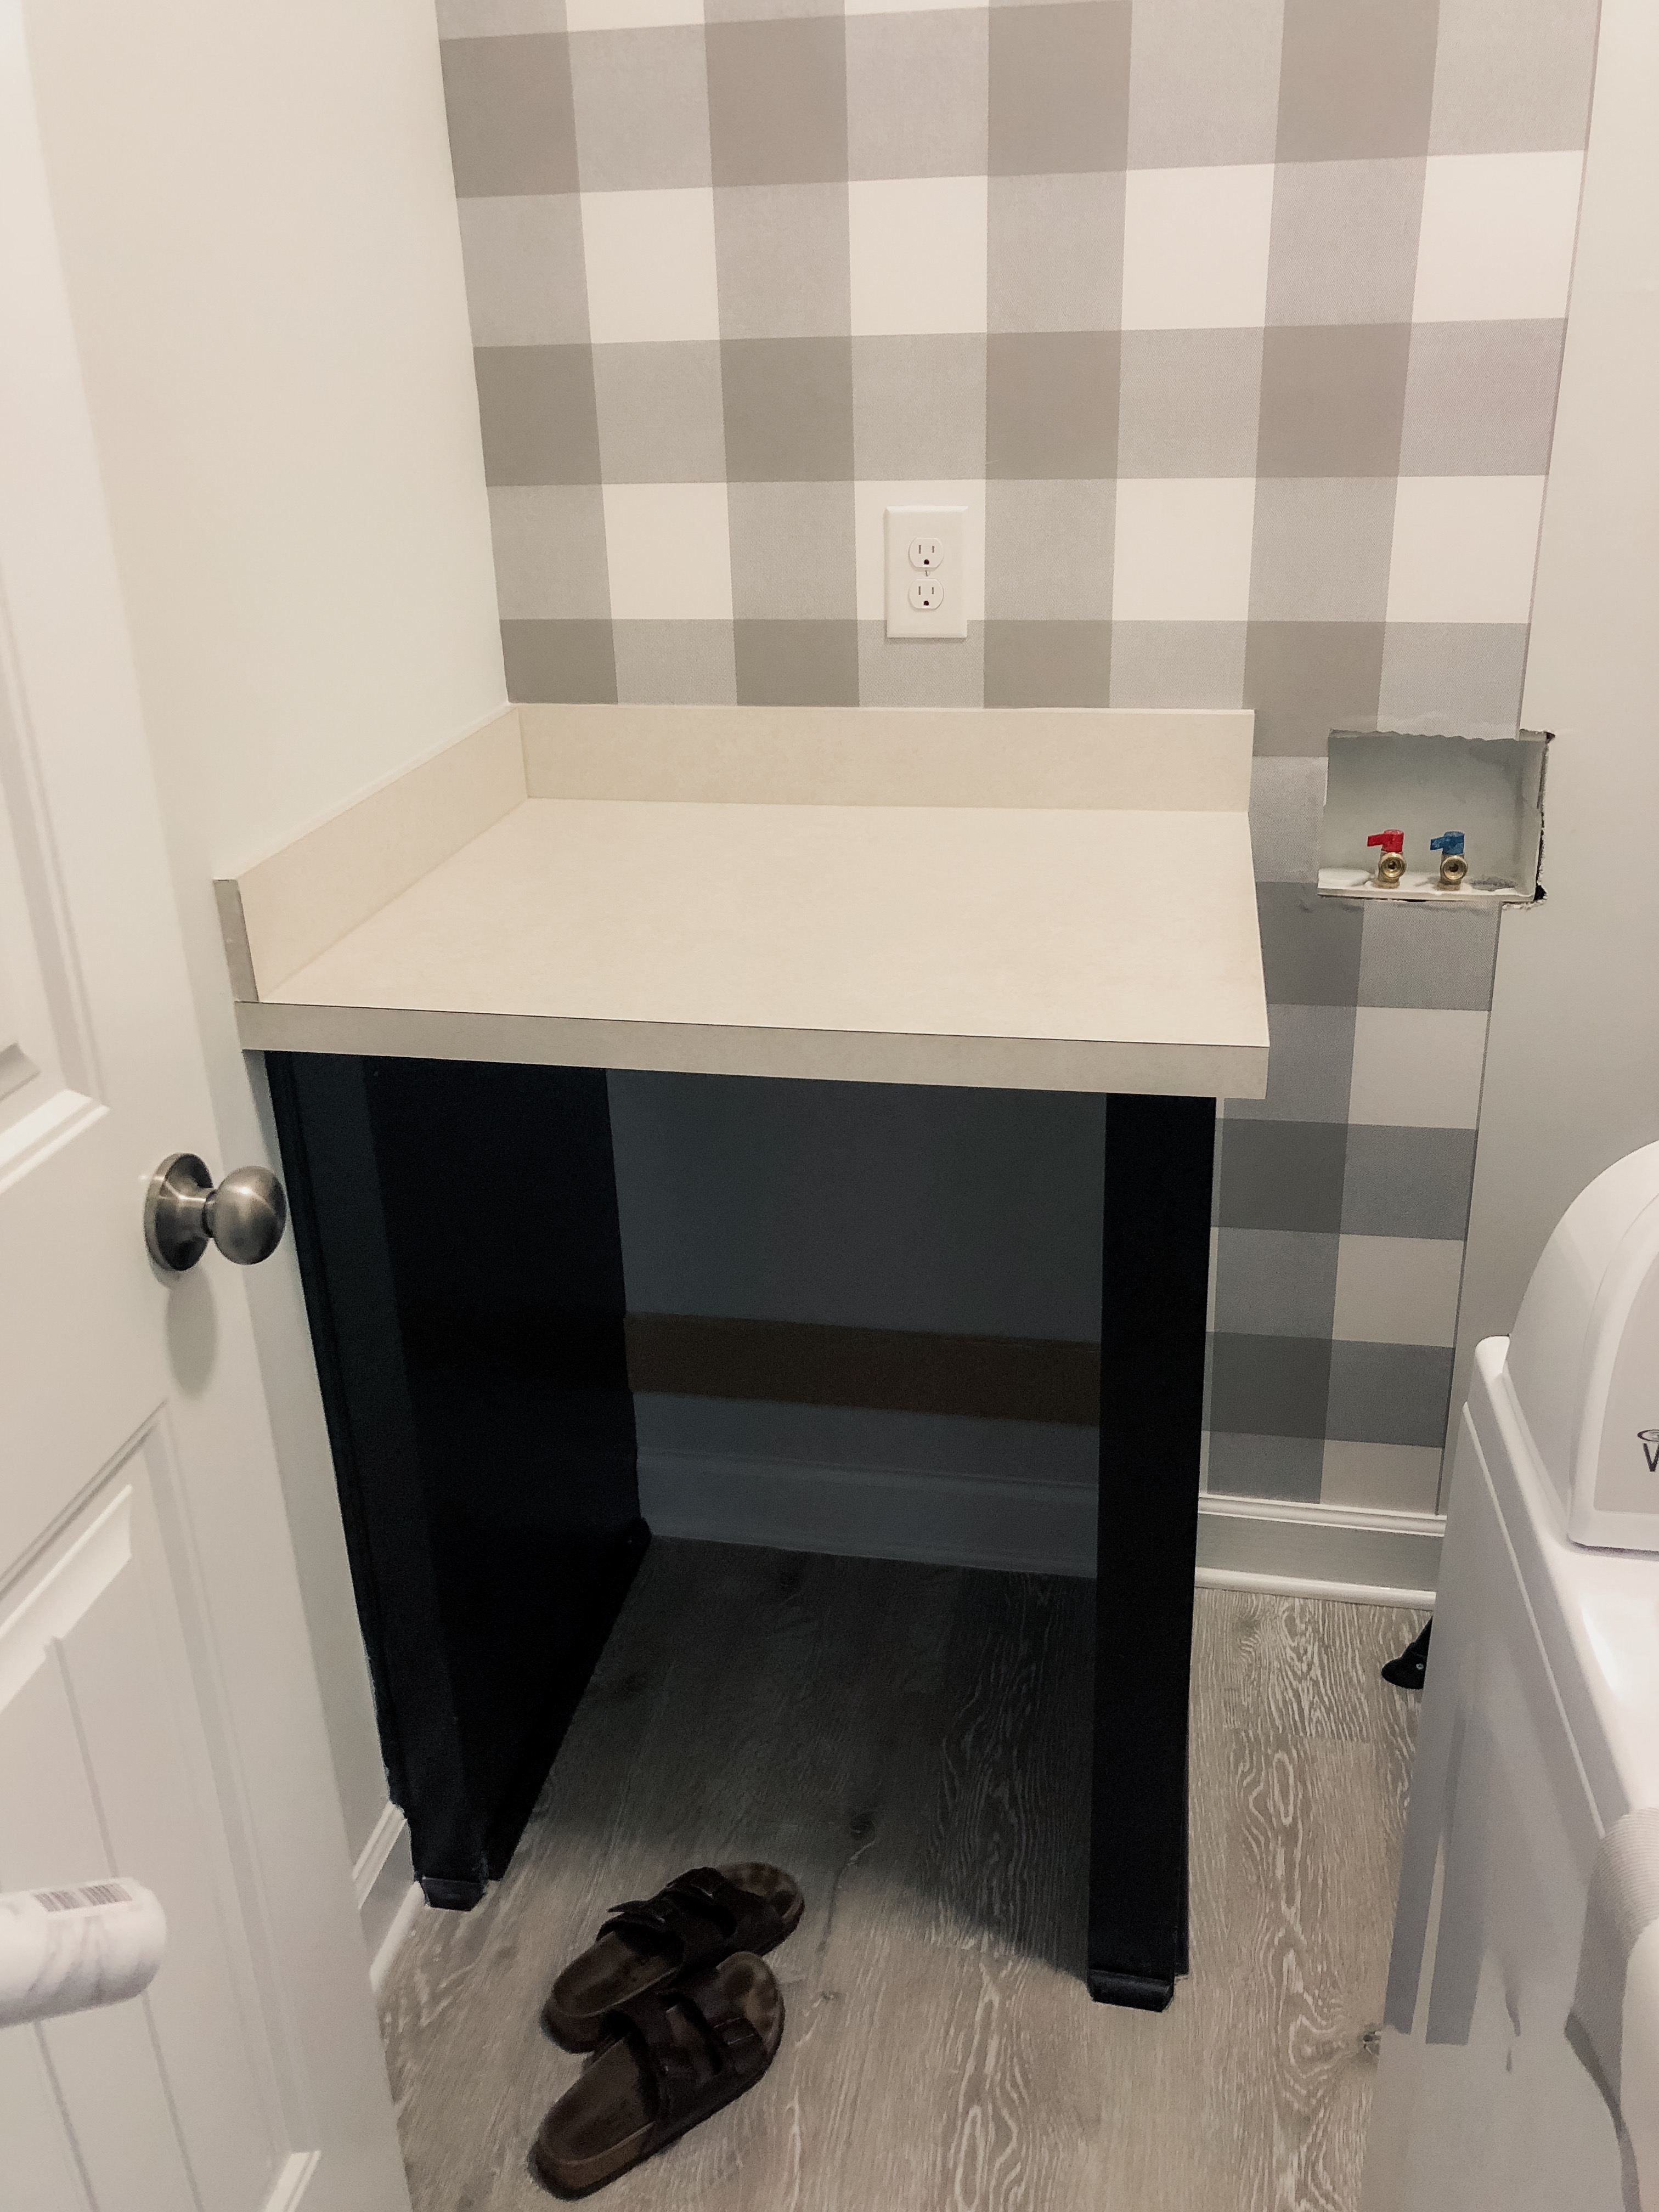
Can you believe it?! What you see on there right now is actually the same laminate countertop, just with contact paper on top! This is the paper we used and overall, it worked out really well. I would suggest if you do this to verify your measurements multiple times and consider which way is best to apply the paper in order to minimize the amount of cuts you have to make BEFORE you cut the paper. The goal is to reduce the number of seams so that it looks like one piece of marble/quartz/whatever. I thought I had it all perfectly planned out but realized afterward (with the help of Stephen) that I could’ve had the whole thing covered in like five less cuts. Oops. Oh well.
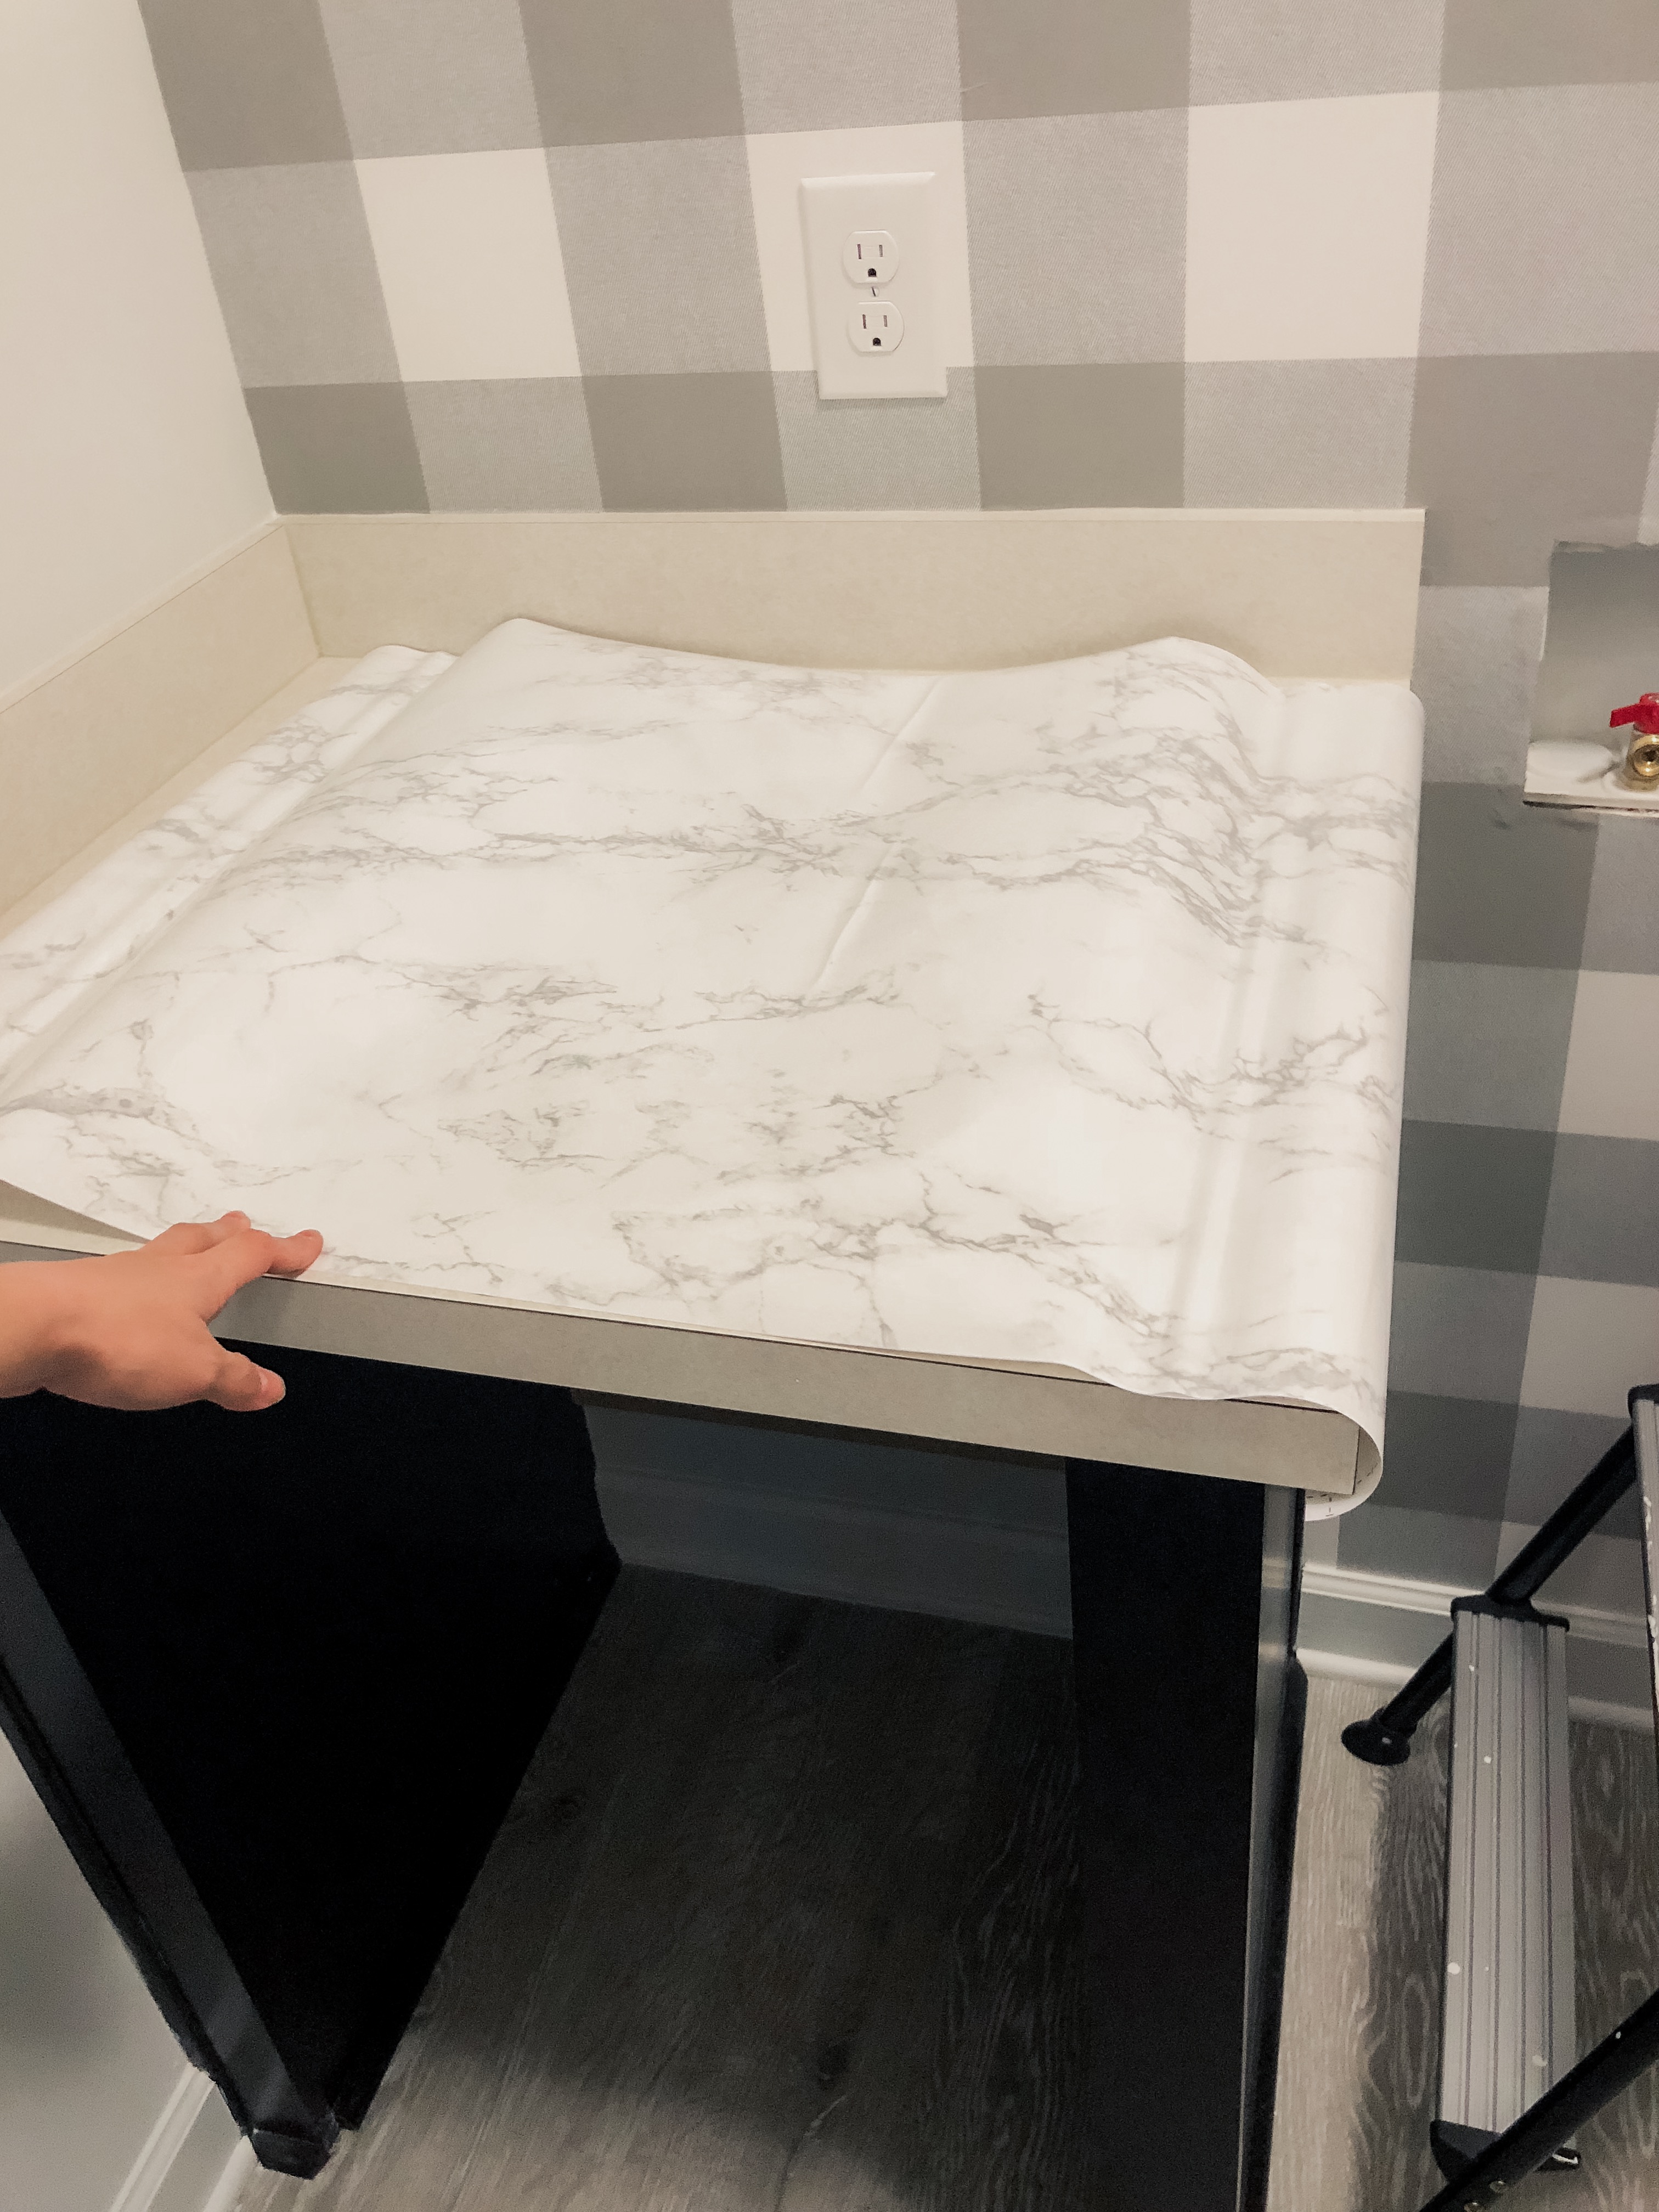
I will say, we’ve had multiple people look at the laundry room and say, “I love this countertop!” When I tell them it’s just contact paper on top of a laminate slab they’re SHOCKED! The funny part to me is that it’s so far from perfect. I could’ve done a much better job at applying it and could’ve reduced the number of seams so I’m always surprised by the compliments considering they have their hands all over it. Basically, this is pretty easy to do, inexpensive, hard to mess up, and looks great. Winnnning!
This is also a great option if you’re renting. You can peel it right off before you move!
We used this and this to help with the installation of both the contact paper and wallpaper.
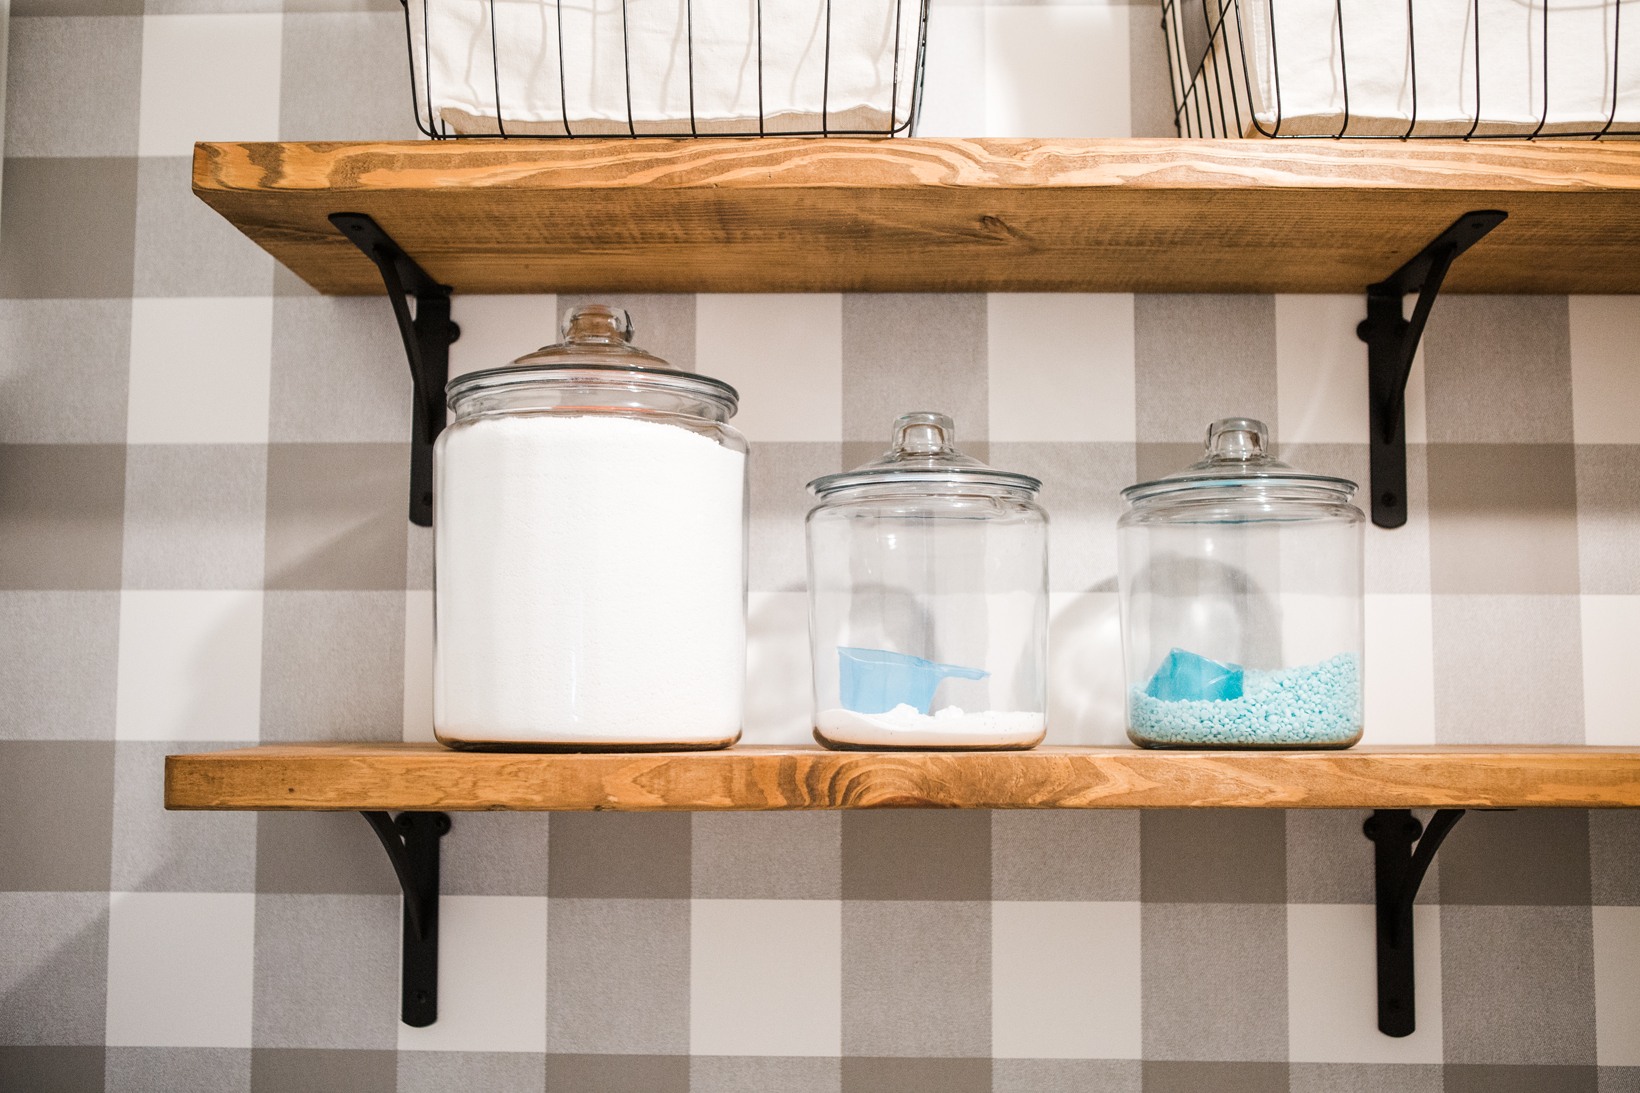
No. 3 – Shelves
I loathe wire shelving. I mean loaaaathe. It’s so dysfunctional to me. We decided to install 2 wood shelves with brackets instead. It was really simple – we purchased two 2×12″ pieces of wood, cut them to 8′ in length, sanded them down a bit, and then I stained them using Minwax Provincial stain.
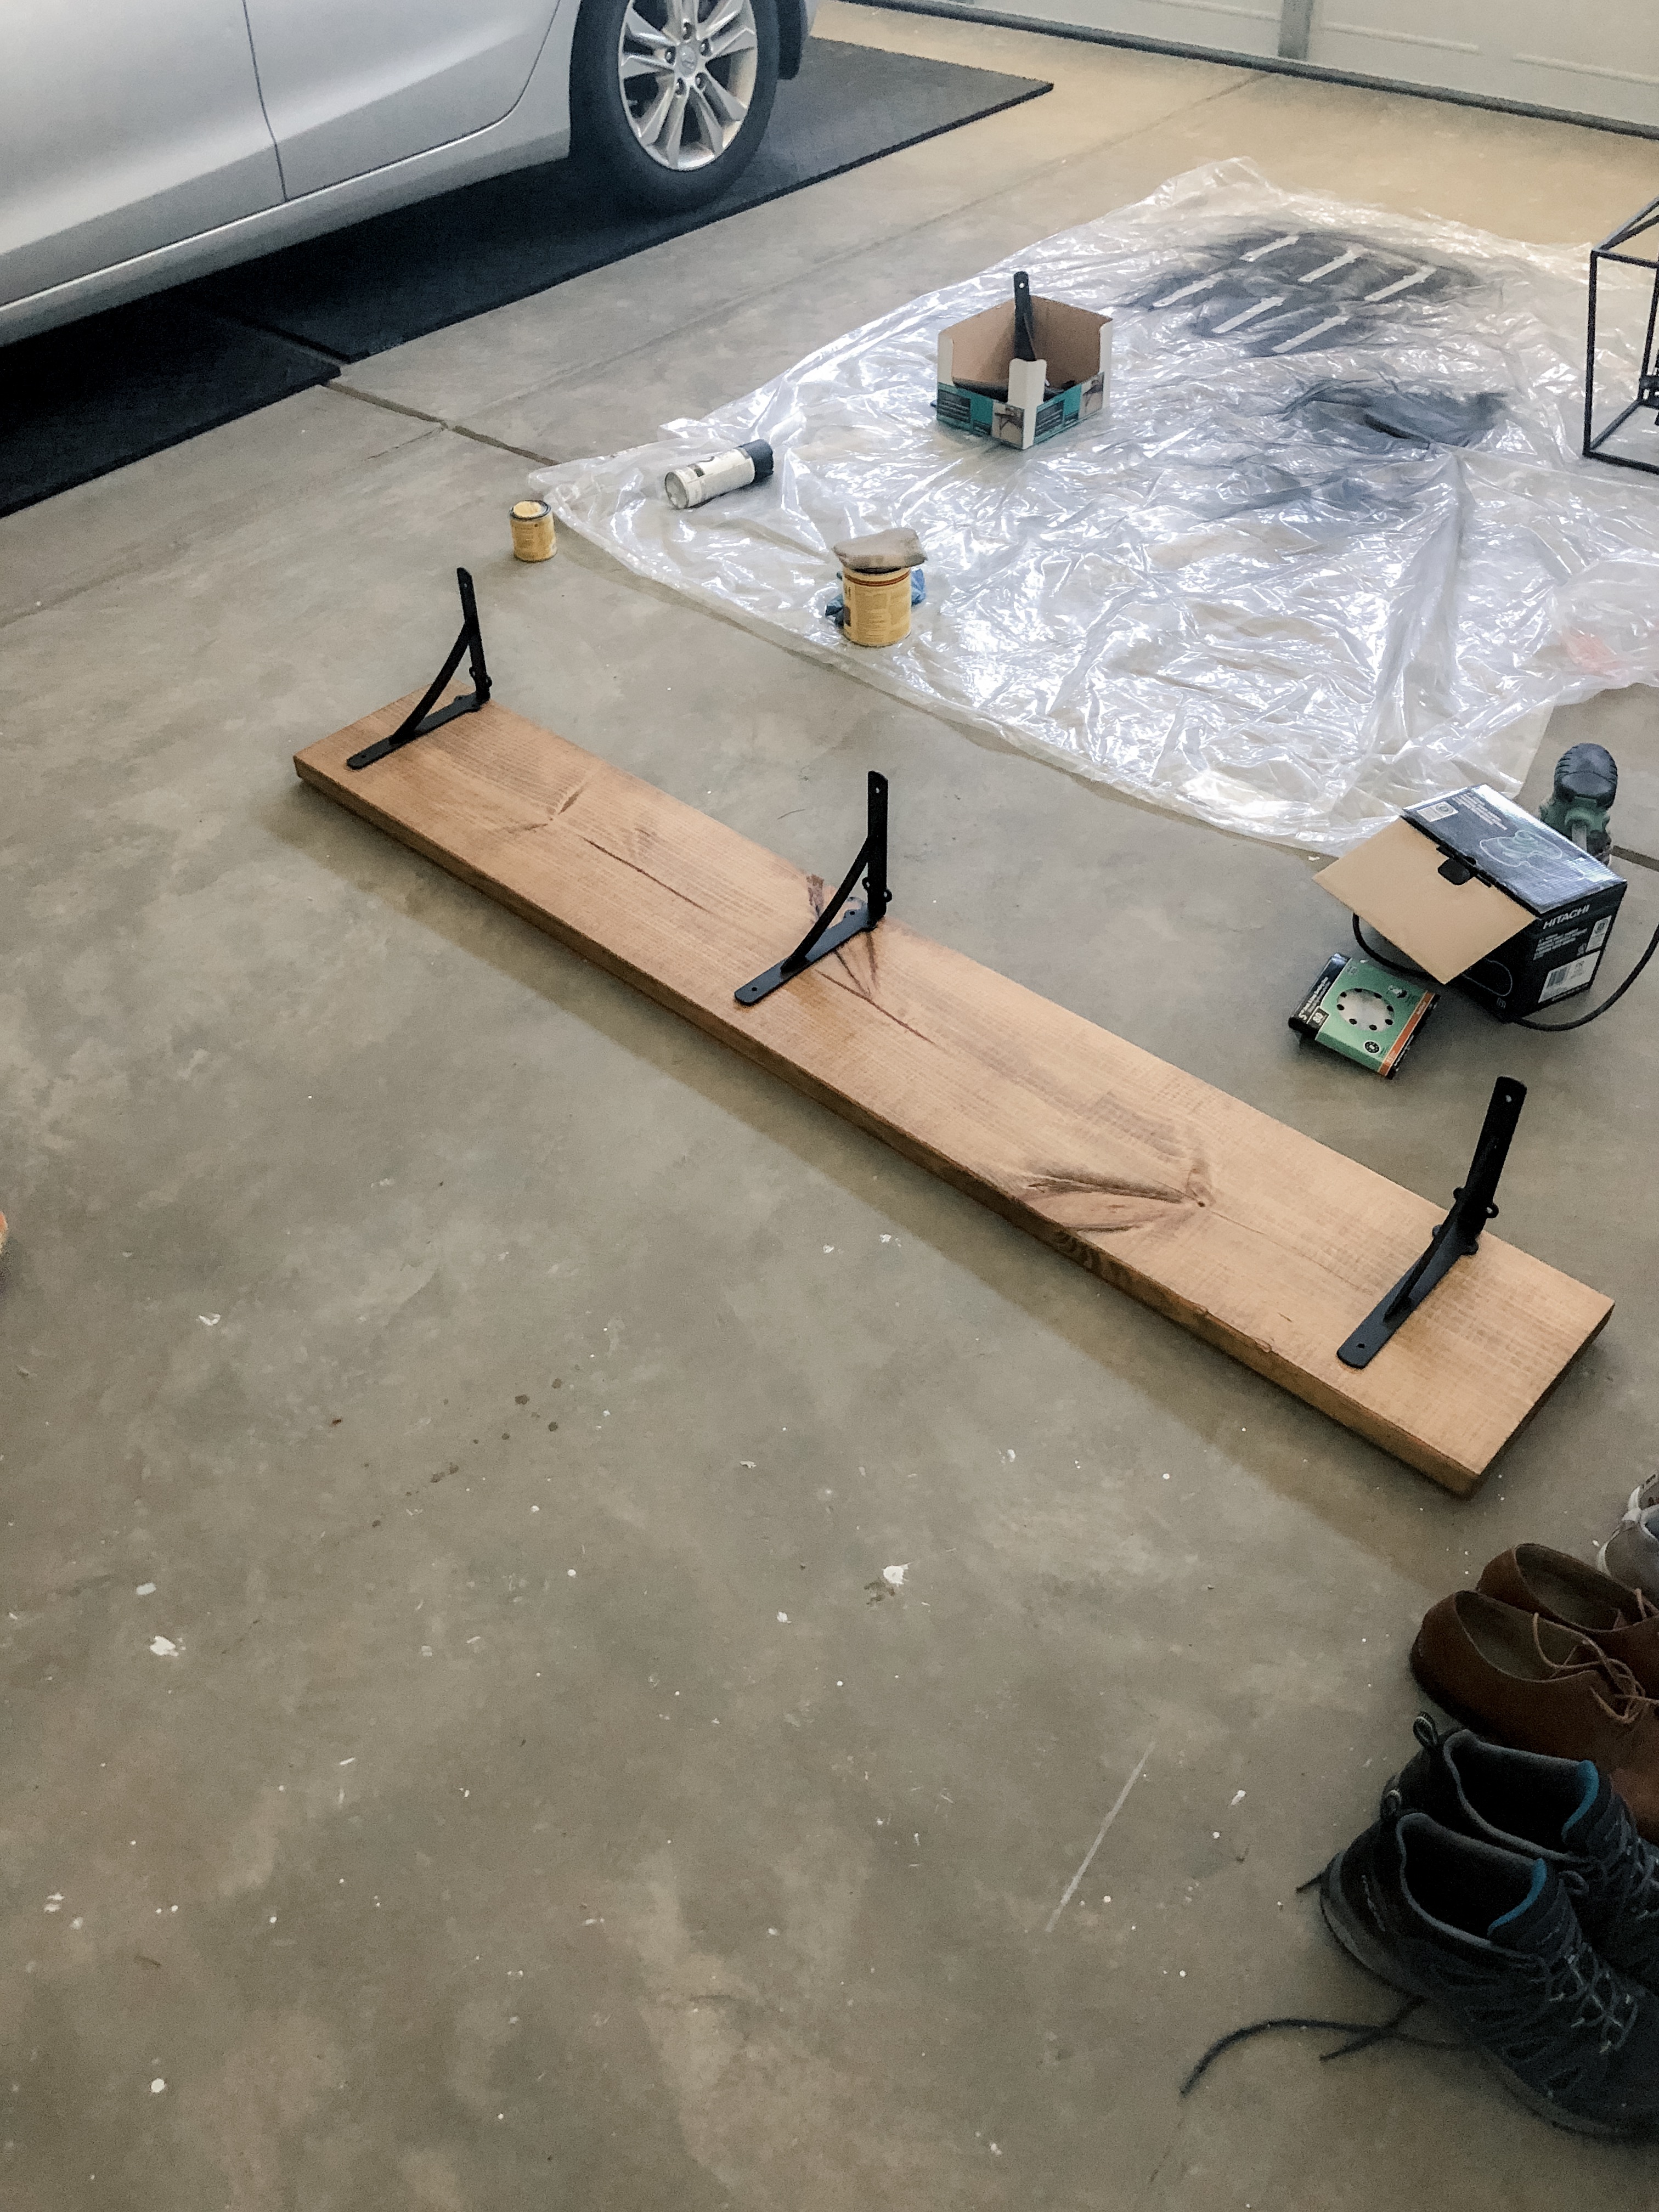
There are the brackets we used which I spray painted black.
No. 4 – Lighting
If you haven’t been able to tell, I’m a big fan of lighting. It’s so easy to make a space feel custom and fit your style! We found this light at a thrift shop and thought it would look really cool in here. It’s a bird cage cut in half! How smart is that… Anyway, it was a plugin light (SO cord) when we purchased it so Stephen had to rig it up so that it could be hardwired into our lighting and work with the switch. GOODBYE boob light! We won’t miss ya!
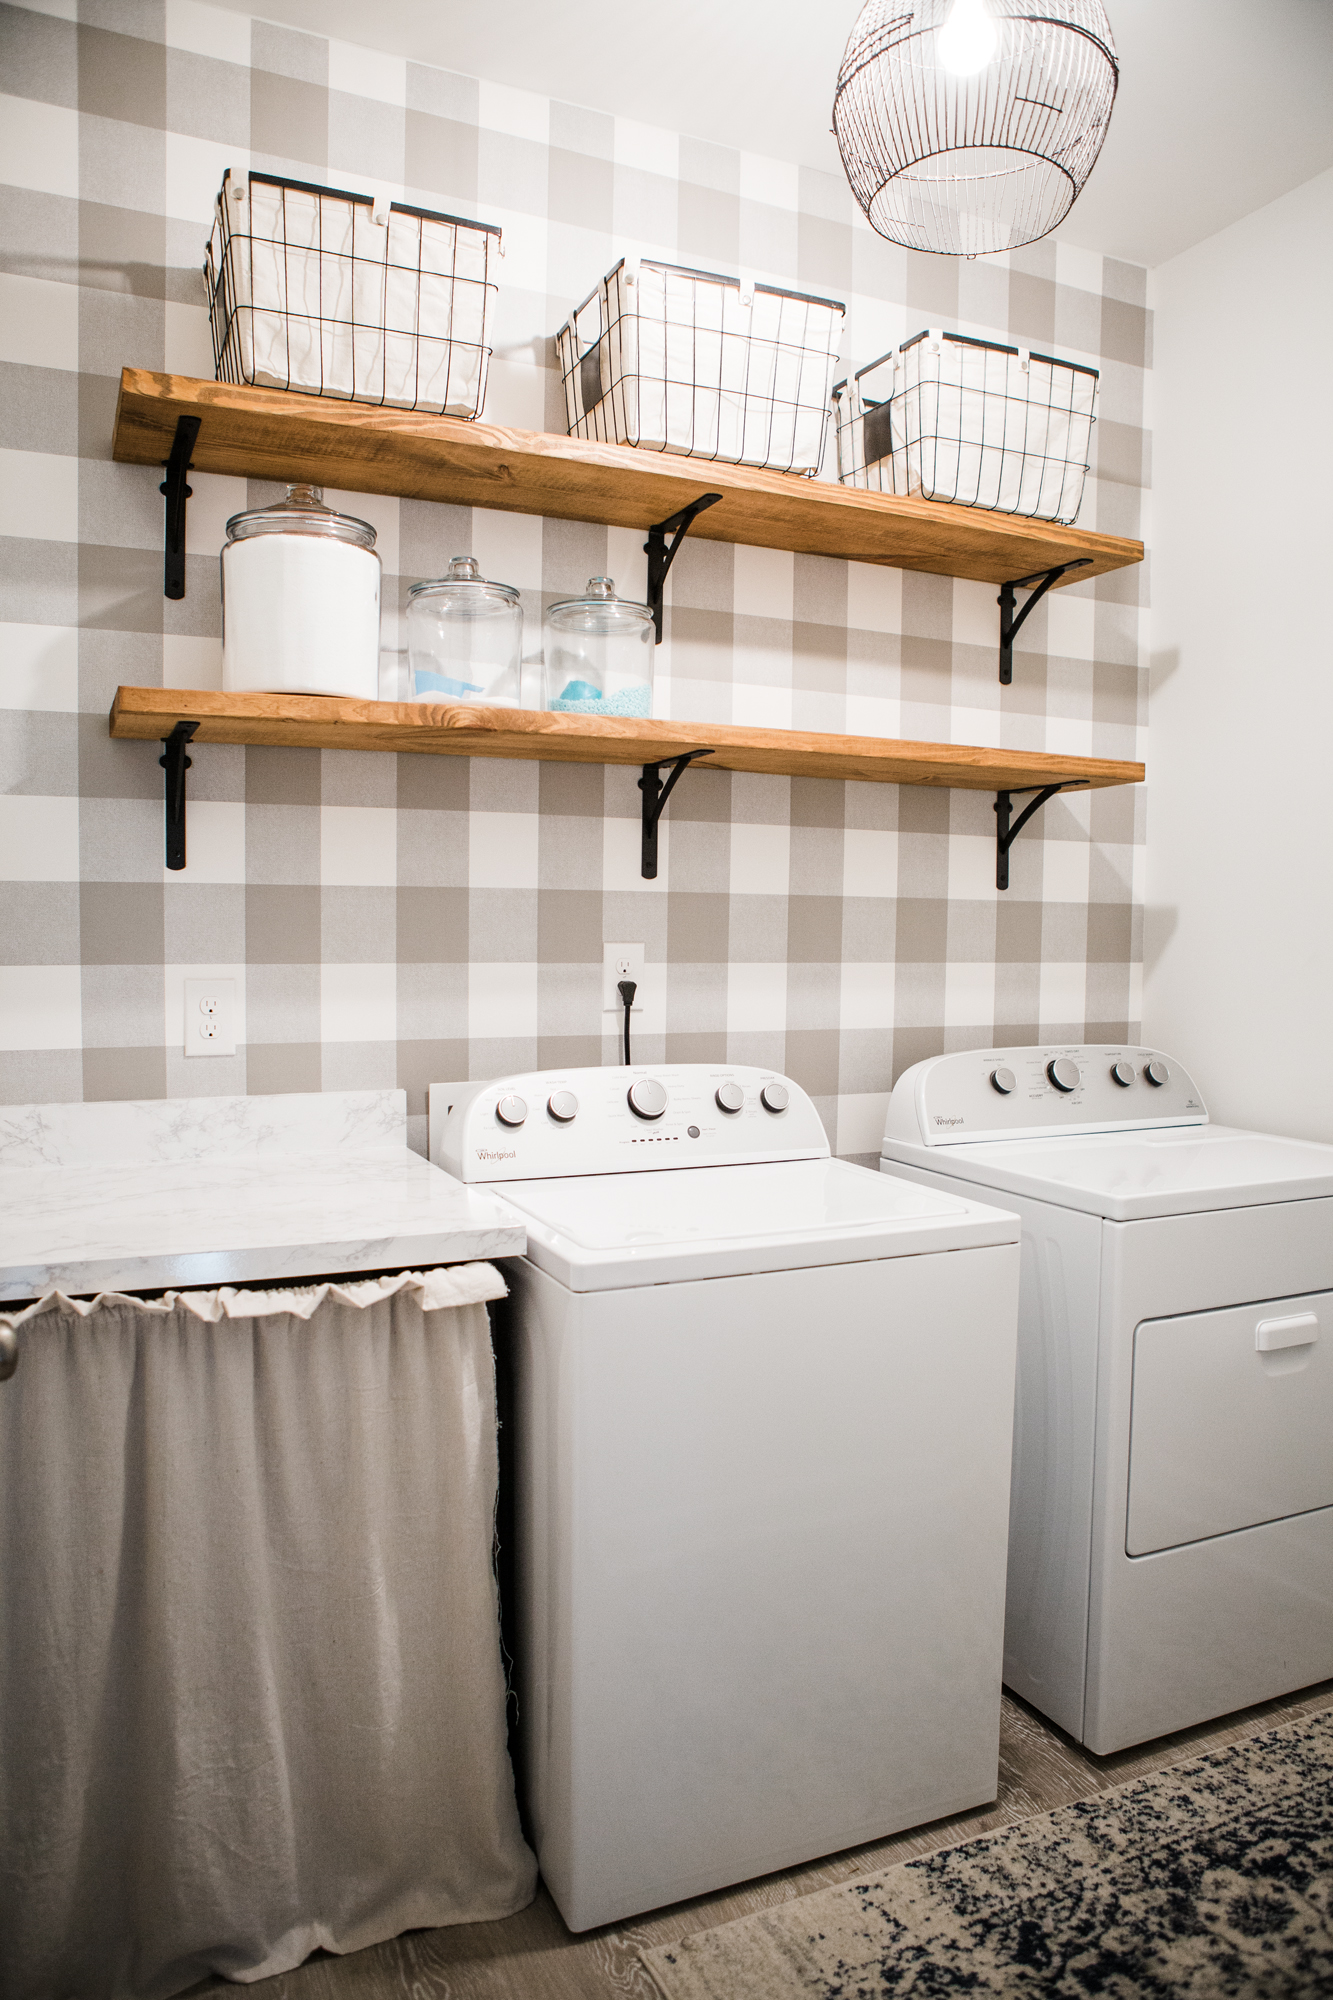
The curtain is a simple sewing DIY I did… It was the first thing I’ve ever sewn on an actual sewing machine (everything else was by hand) so it’s far from perfect but it does the trick. I cut up a leftover piece of drop cloth and attempted to make a ruffle. HA! Another thing I could do with that curtain – make a mini DIY drop cloth curtain with hooks. I’ve debated on doing that but like I said, this works for now!
Underneath the countertop is basically just dead space so we put our steamer, bleach, dryer sheets, etc. in there. The curtain just covers all of that up. Eventually we’ll put a shelf or two in there so that it’s more functional.
In case you’re wondering, here’s the link for the rug in here!
I’m still trying to figure out how we’re going to hide the cords! The spacing is kind of awkward. We’ll figure it out though and of course I’ll let you all know what that’s completed!
Pin for later:
Other posts you might enjoy:
Modern Farmhouse Laundry Room Reveal
World Market Lighting
DIY Board and Batten
jordan jean
Leave a Reply


Love this! How has the contact paper held up? Any tricks for applying it on the front piece?
It looks great still! It doesn’t get as much use there as a kitchen countertop would though so I can’t speak for something like that. We did a lot of visualizing and thinking with the paper prior to applying it. We applied it so that all of the edges were covered and we didn’t cut pieces for each side. If that makes sense? Basically, using the paper that you have, determine how you can apply the paper with the least number of cuts. I hope that helps?!
Hi! I know this is kind of an old post.. do you know the square footage of the wall that you did the wallpaper on?
Just curious for proportions. Thanks!