July 19, 2018
Adding board and batten to our entryway was something we planned on doing before our house was even finished. HA! I knew that with a good amount of research, we could accomplish the project relatively quickly without spending boat loads of money and that it would add a lot of character to our home. Other projects got in the way, however, so it wasn’t until last weekend that we decided to tackle this one.
We researched and looked at many pictures of board and batten to determine what route we wanted to go with the materials. Board and batten can be done really inexpensively using furring strips but we thought it would take some more time and wouldn’t give us the smooth finish we were aiming for. We decided to use 1/2″ MDF and add our own touches to it with some trim and a little “shelf” around the top. We love the way it turned out and I’m so excited to be sharing how you can do it to your own home too!
Did I mention this project cost us less than $100?! I had to double check the numbers to make sure because I can’t believe we were able to do this in under $100… AND we had material left over that we’re going to use on some other projects. WHAT?!
I thought a lot about the best way to explain this tutorial with you all because I know that all spaces are going to be different sizes. To make it easiest to understand, I’m just going to share the general way we did this and avoid sharing all of the specific numbers for our space (weird corner sizes, etc.). If you have any questions please let us know!
What you’ll need:
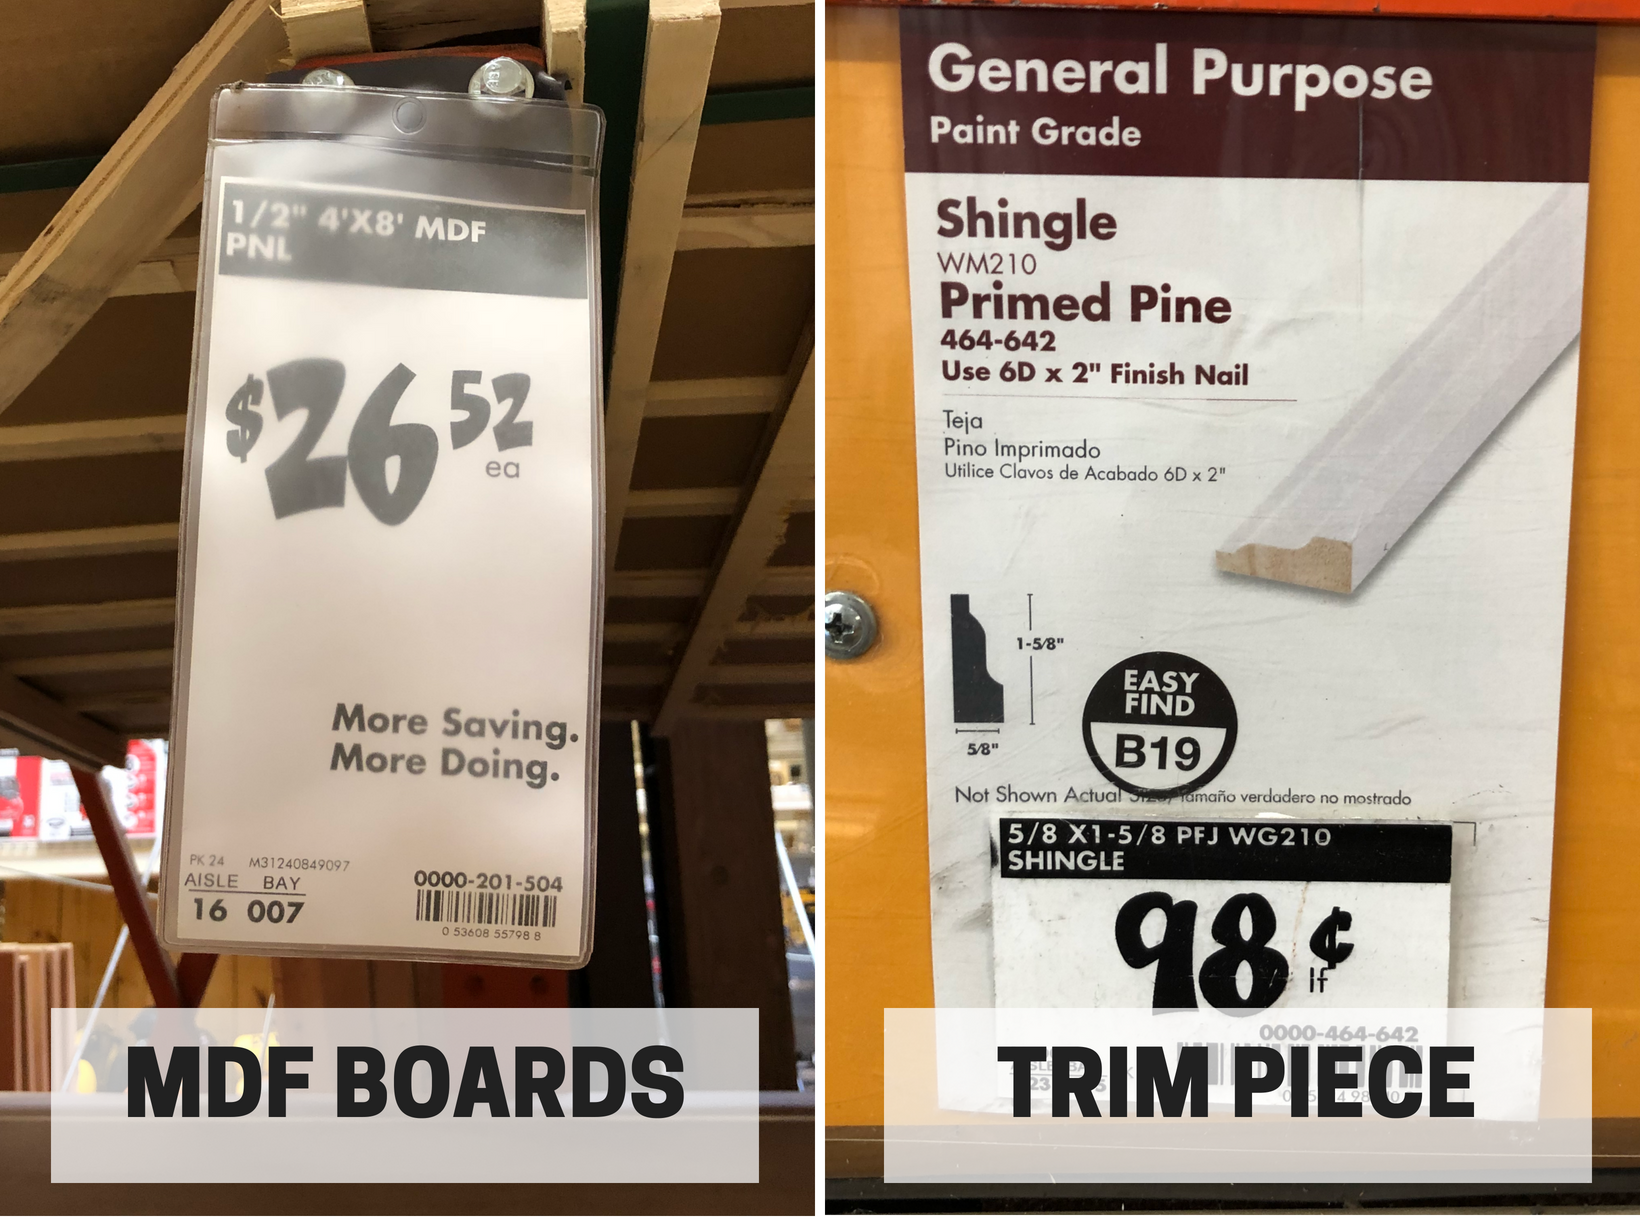
- 1/2″ 4′ x 8′ MDF – we purchased 2 of these
- We had the boards stripped down at Home Depot and then Stephen cut them length wise at home. Something I wish I would’ve done is said something about the saw blade to the guy at Home Depot. I think it was pretty dull because the boards were “frayed” a bit on the edges. It wasn’t life or death but I did have to sand the edges of each strip before we applied it to the wall because of it… Boo. Each cut at Home Depot is $0.25 but for like $5.00 total it was so worth it.
- 4 – 6″ top horizontal strips (I say top because it was the one right under the “shelf” and trim)
- 4 – 4″ middle horizontal strips (this was actually an accident by the Home Depot guy… We asked for 3″ but hey! The 4 looks great!)
- 4 – 2″ for the “shelf” to sit on top of the 6″ piece
- Remaining MDF – 3″ vertical strips (I think it ended up being like 15 strips but don’t quote me on that)
- We had the boards stripped down at Home Depot and then Stephen cut them length wise at home. Something I wish I would’ve done is said something about the saw blade to the guy at Home Depot. I think it was pretty dull because the boards were “frayed” a bit on the edges. It wasn’t life or death but I did have to sand the edges of each strip before we applied it to the wall because of it… Boo. Each cut at Home Depot is $0.25 but for like $5.00 total it was so worth it.
- 5/8″ x 1 5/8″ Primed Pine Shingle – we purchased 2 of these
- Paint – we painted ours using Valspar Signature Ultra White, satin finish
- Paint brush and roller
- 18 gauge nail gun + air compressor
- Miter saw
- Sanding block
- Level
- Pencil
- Caulk + caulk gun
- Wood glue
- Spackling putty – this is my favorite
- Wood filler/joint compound (I used joint compound because I had some on hand from this project and it worked great but wood filler would too!)
How to do it:
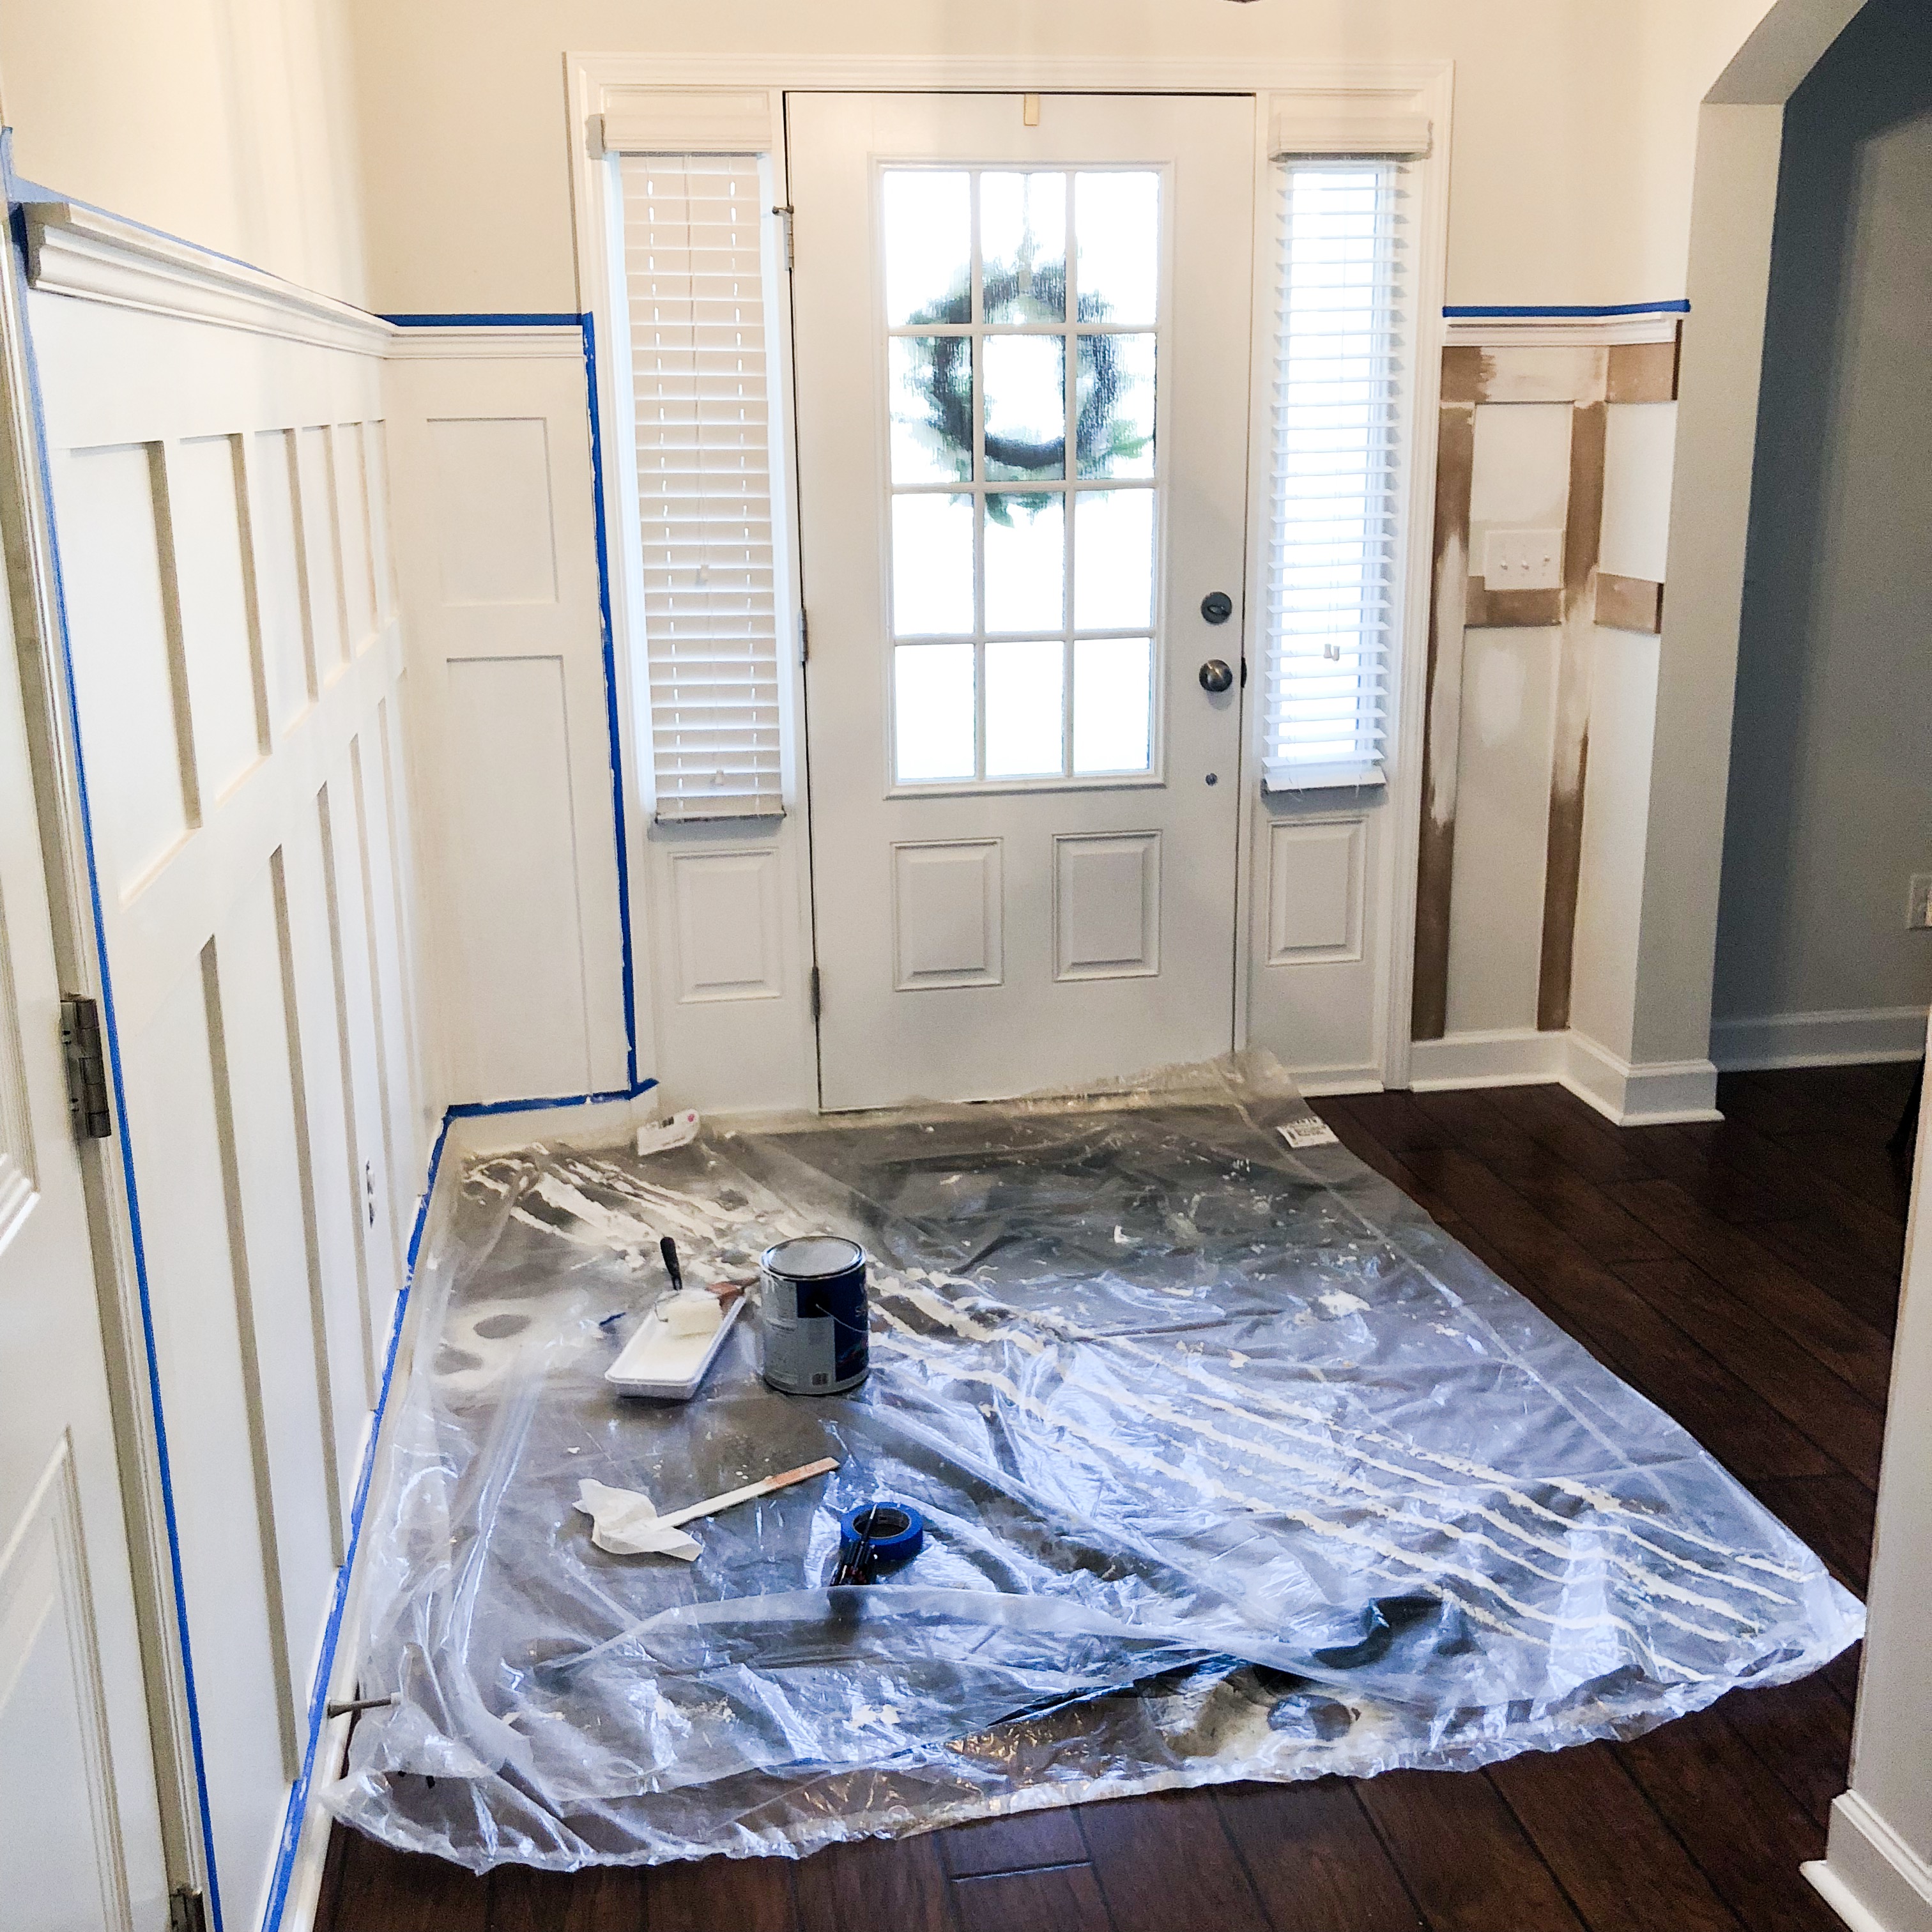
- I would 100% suggest taping off your area with painters tape before you buy any materials. Like I said, everyone’s measurements will be different so you might not even need 2 boards of MDF like we did! Double, triple, quadruple check all of the math.
- Get all of your supplies, MDF stripped down, etc. and get this party started!
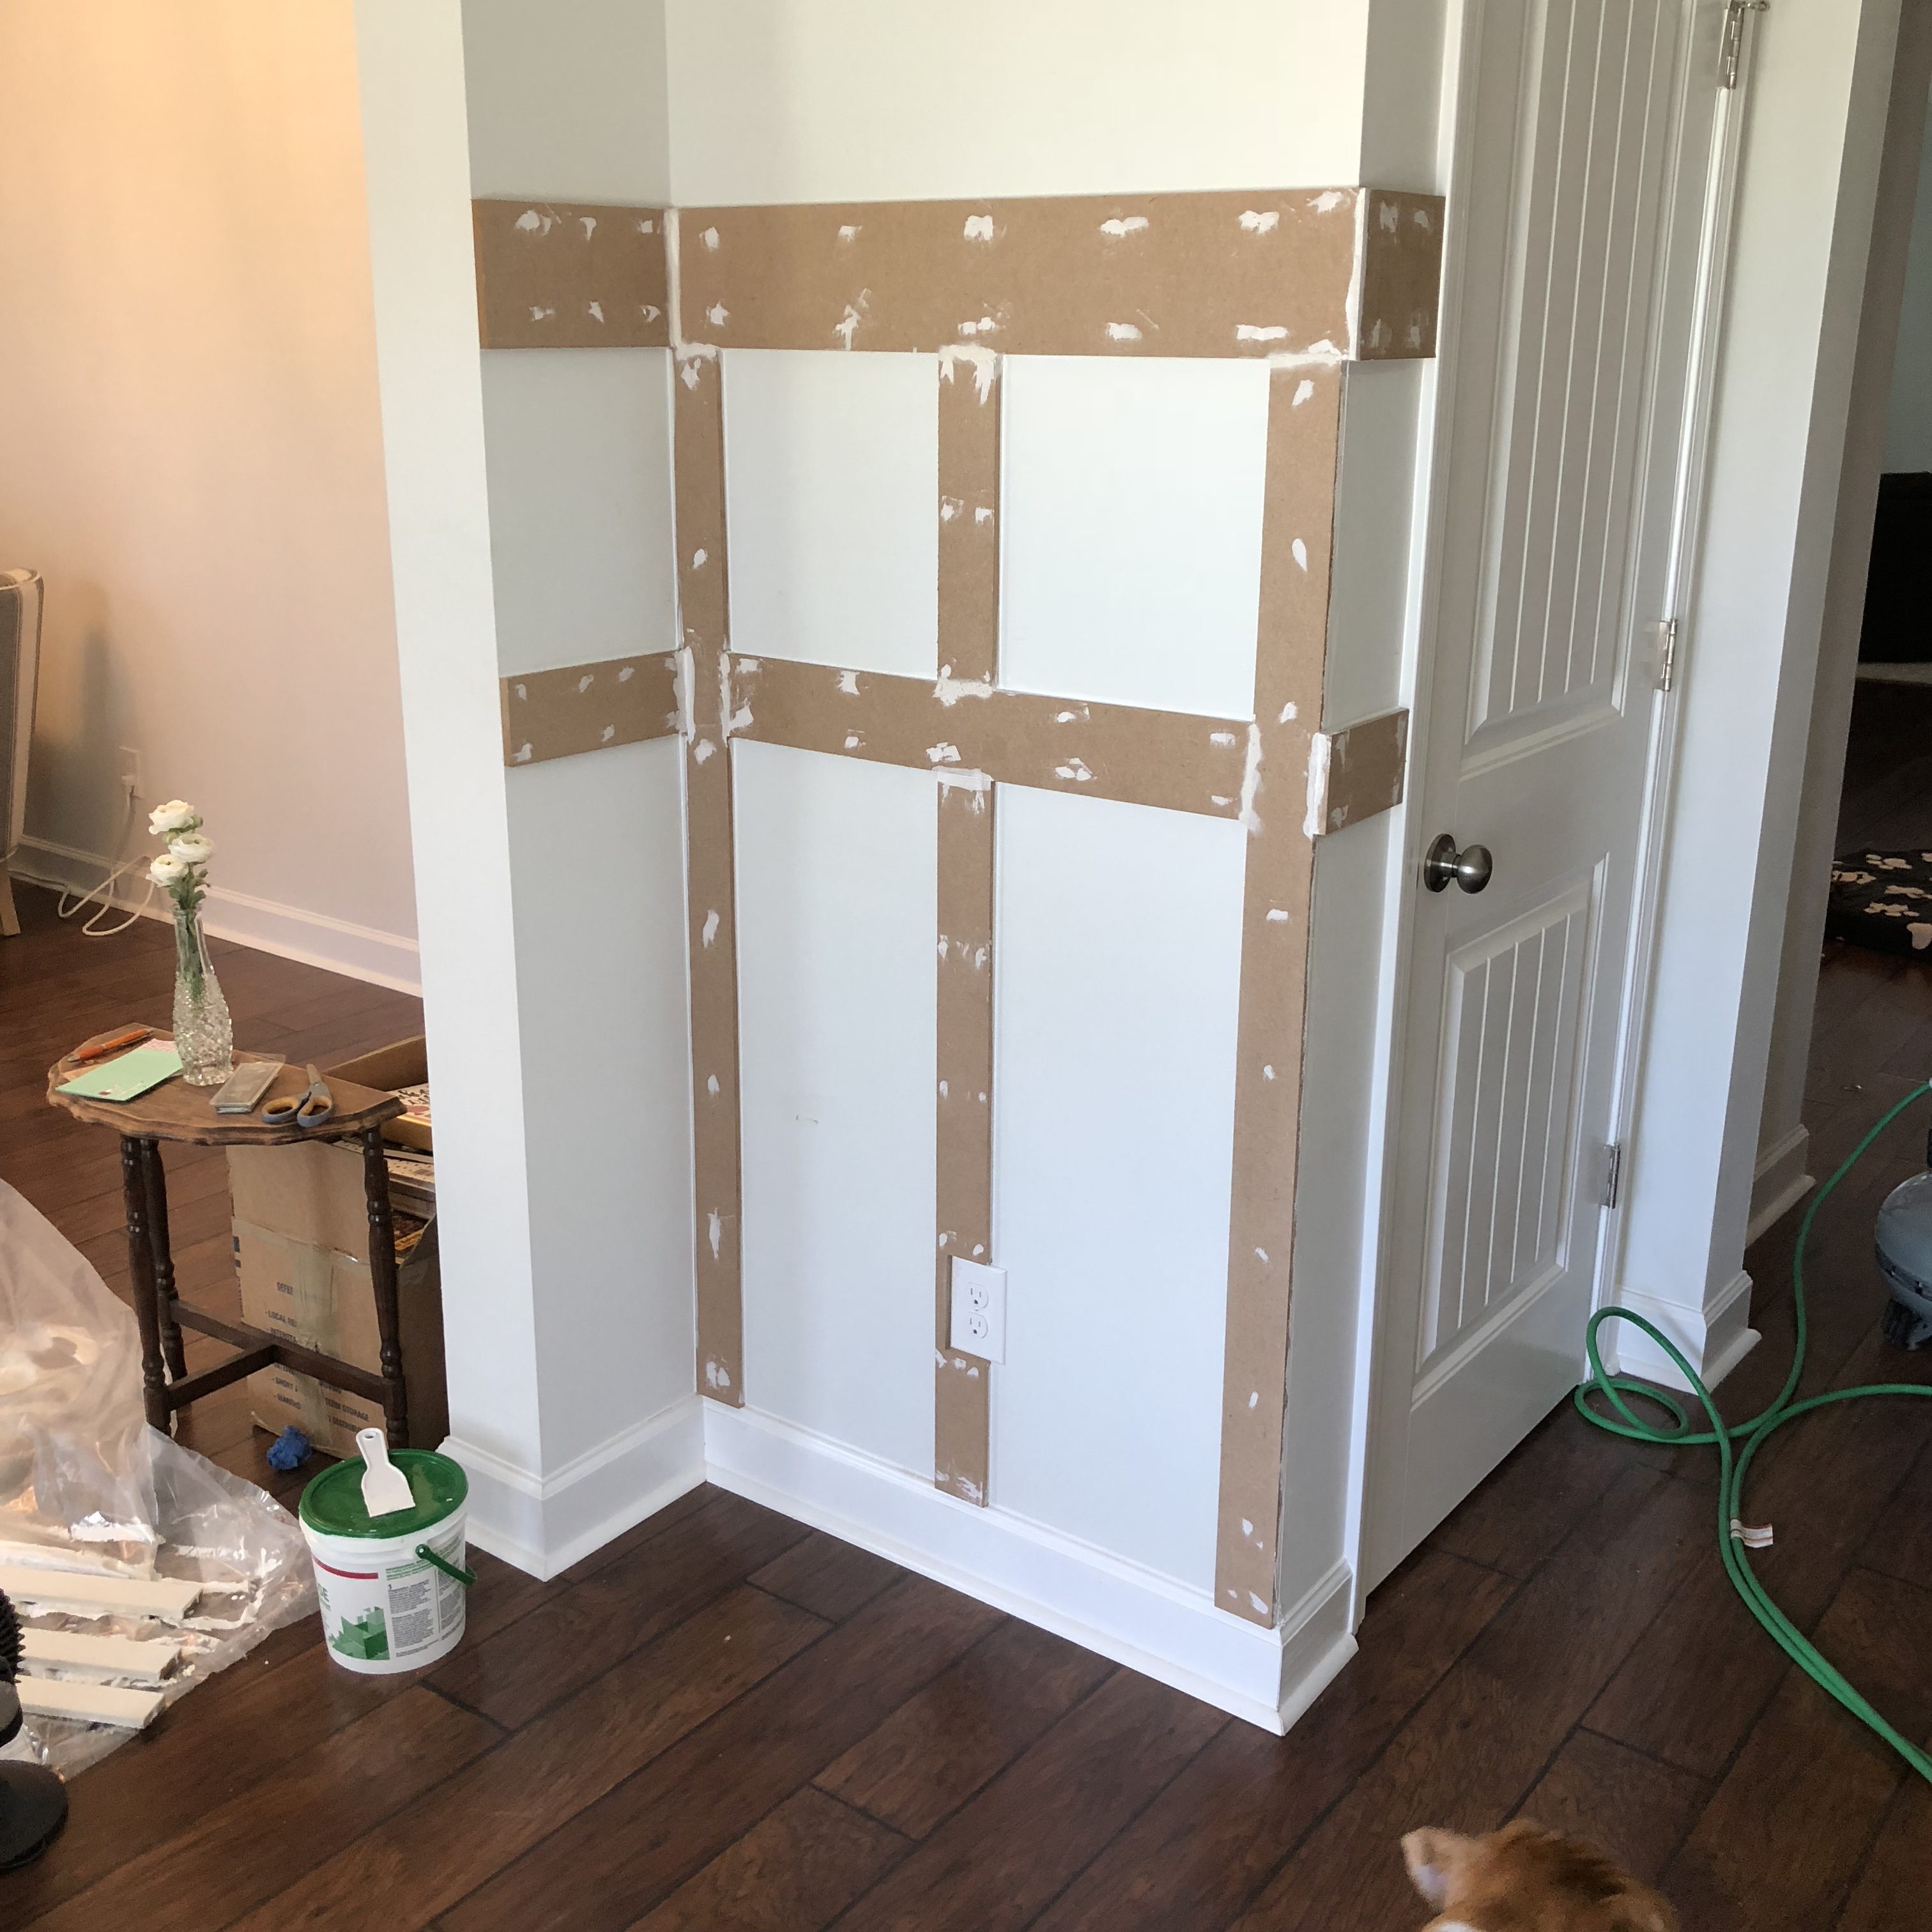
- Apply all of the horizontal 6″ boards to the walls (from the top of the 6″ board to the start of our existing base board was 59-3/4″).
- Cut the 6″ board to length.
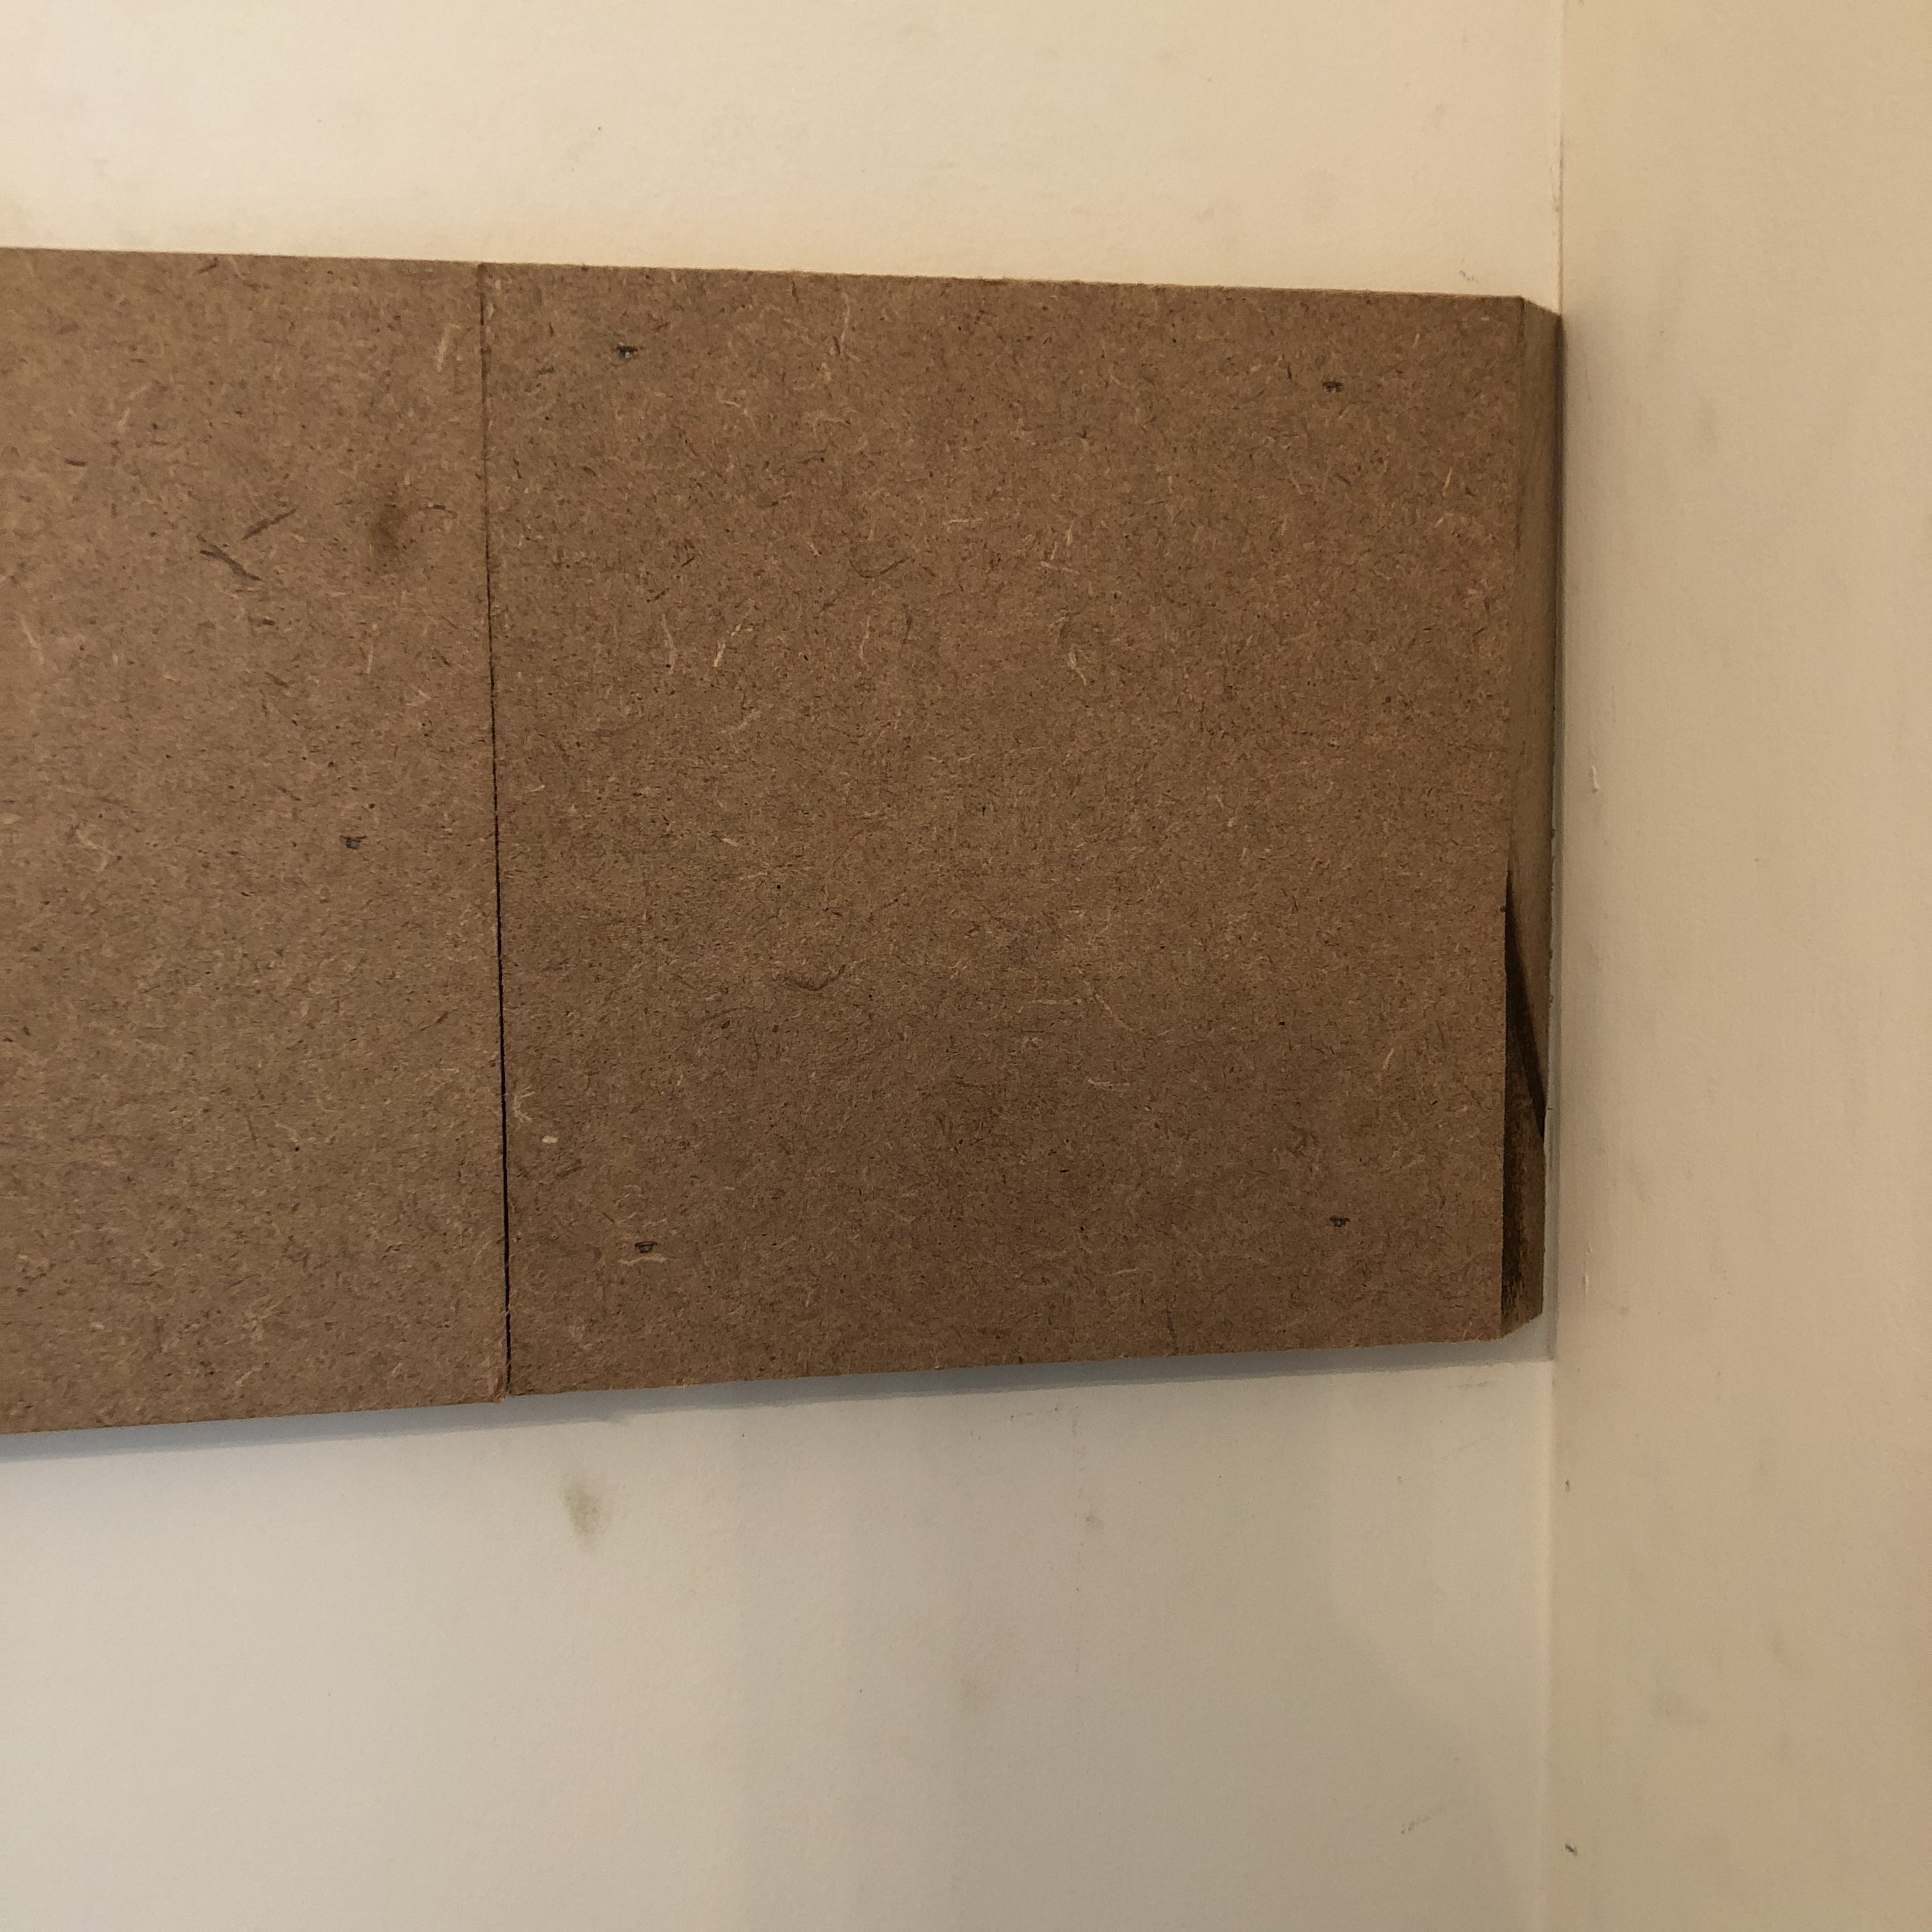
- For our space the MDF was not long enough so we had to connect multiple pieces together.
- Cut the corner pieces at 45 degree angles.
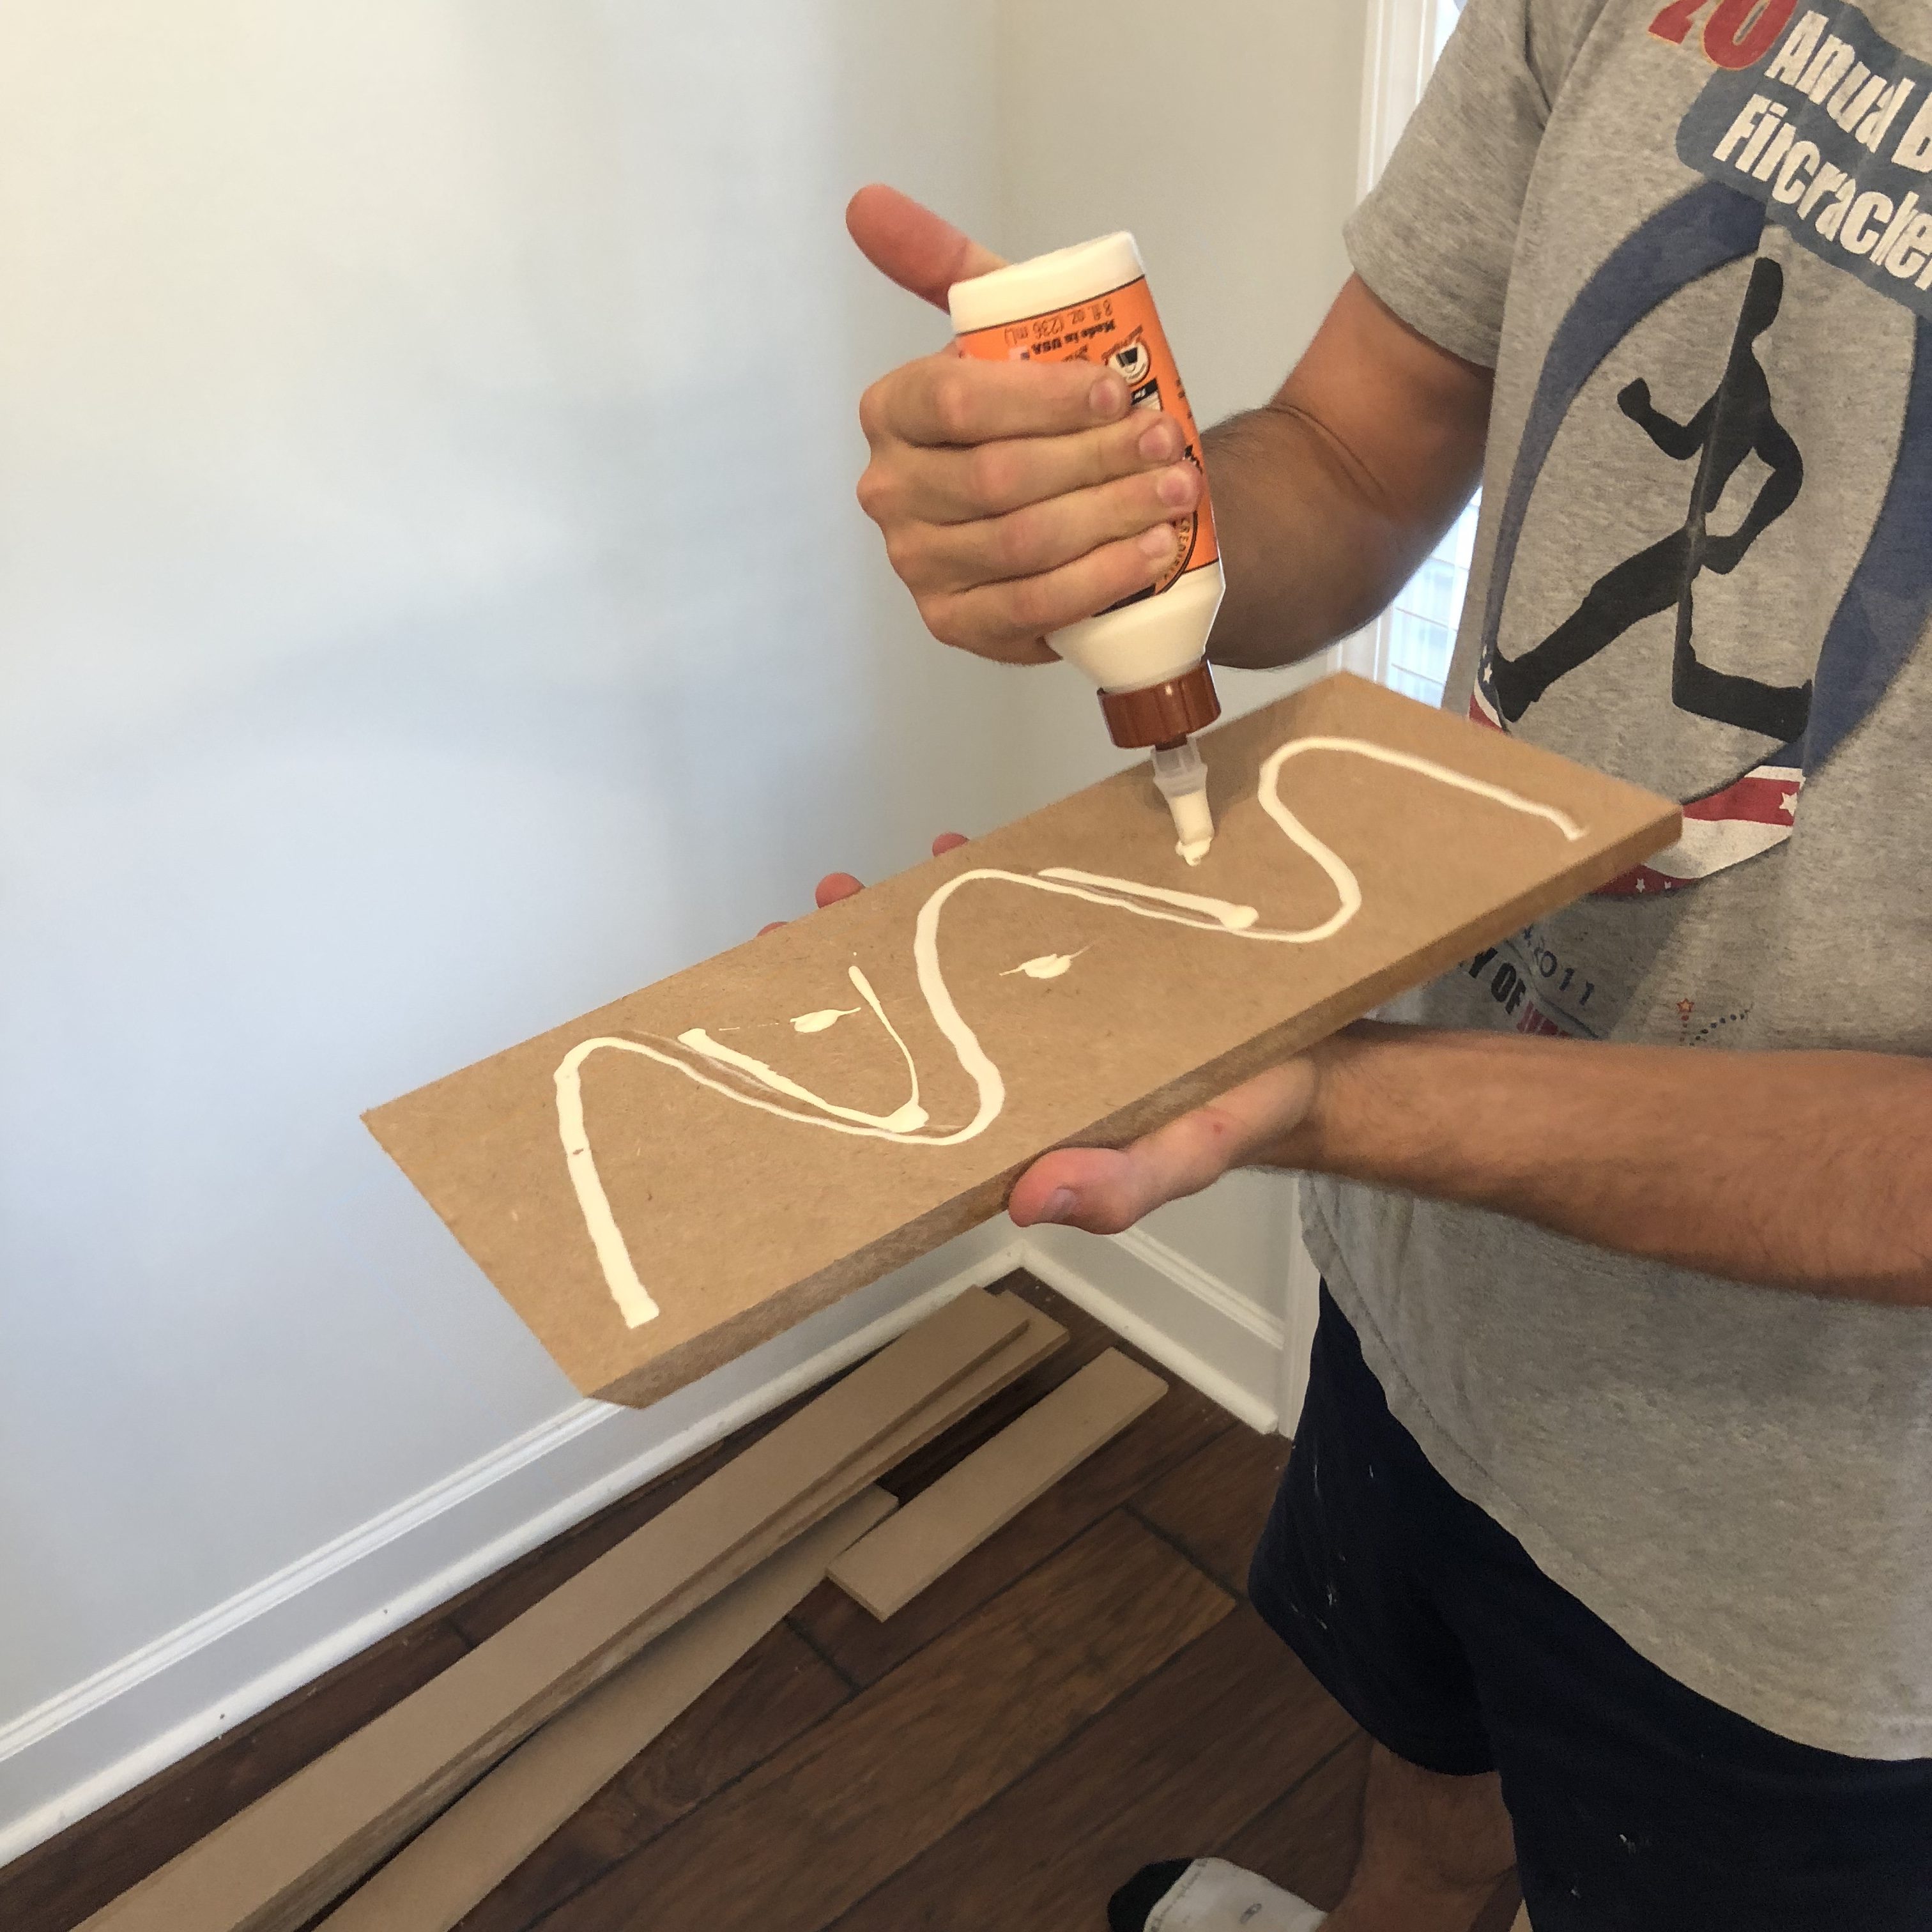
- Apply wood glue to the back of the MDF strip.
- Place the board on the wall and double check it is placed where you want it and THAT IT IS LEVEL.
- Nail the board to the wall using the nail gun.
- Repeat until all of the 6″ horizontal boards are on the walls.
- Cut the 6″ board to length.
- Add the 3″ vertical strips to the “edges” of the walls.
- Cut the 3″ MDF to length.
- Apply wood glue to the back of the MDF strip.
- Place the board on the wall and double check that it is placed where you want it (try to make the gap between the 6″ board and 3″ board as small as possible of course) and THAT IT IS LEVEL.
- Nail the board to the wall using the nail gun.
- Repeat until all of the edges of the walls have vertical boards.
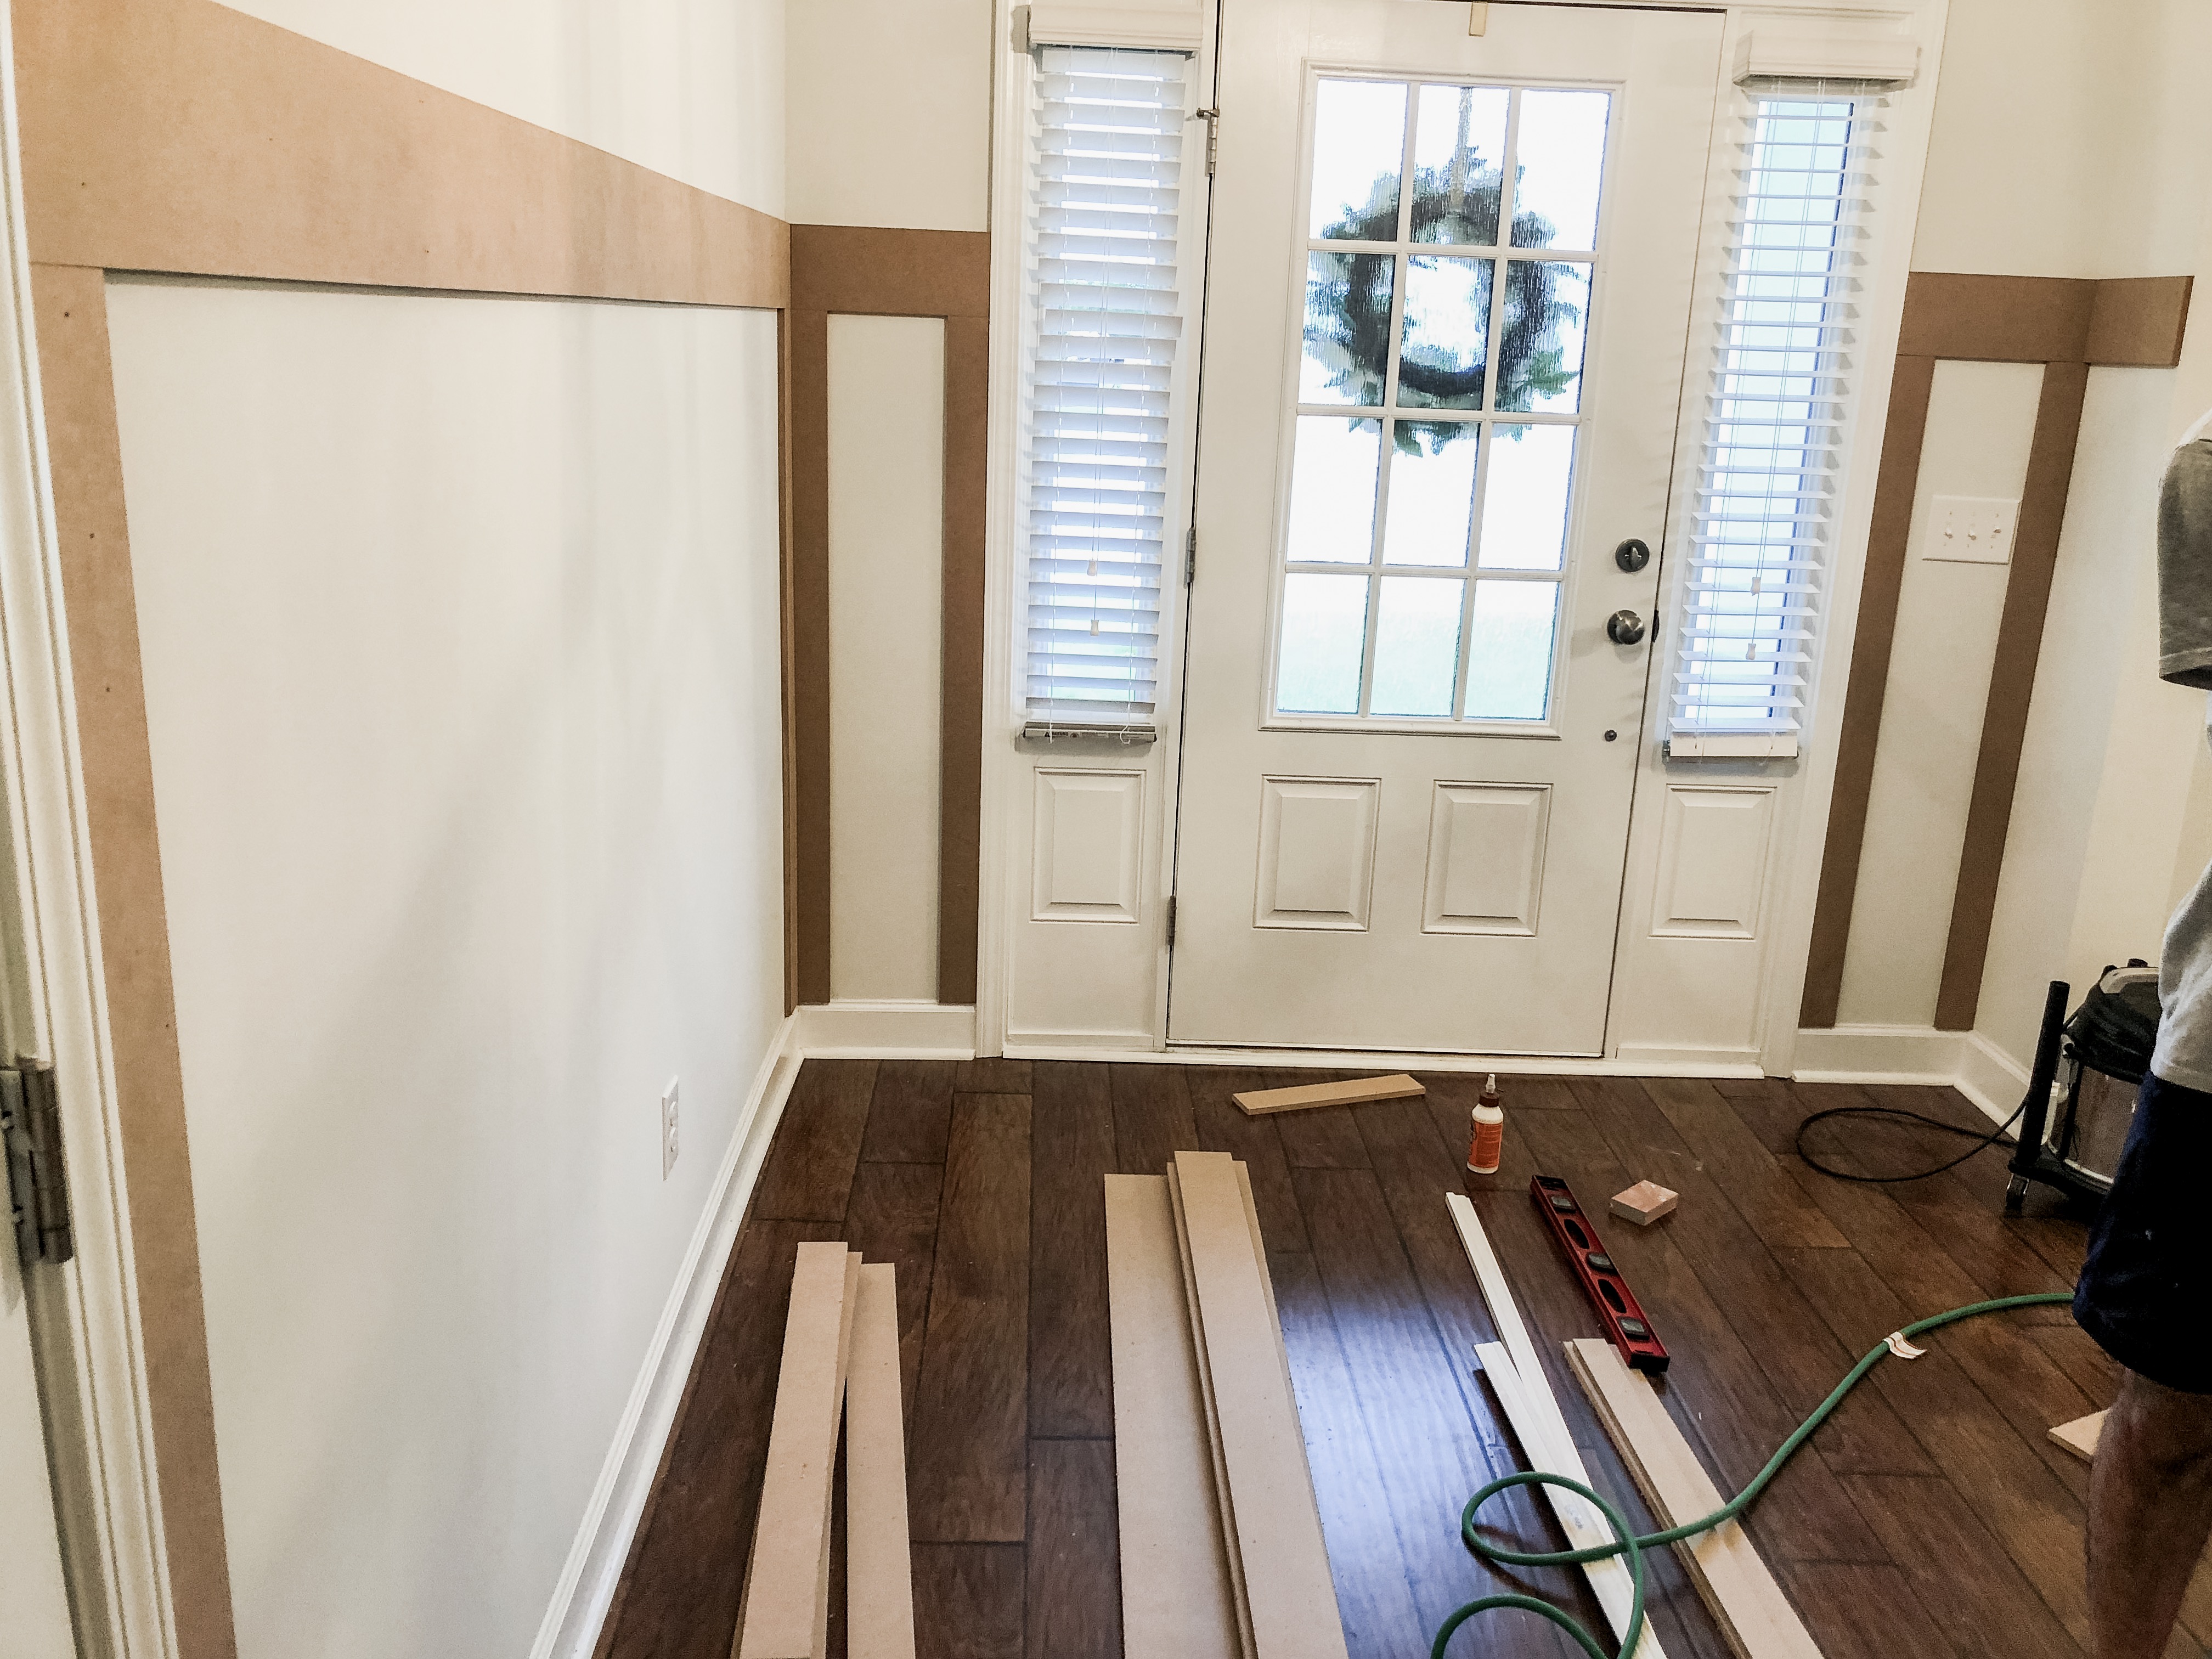
- Add the 4″ horizontal strip to the middle. Ours is 13-3/4″ inches between the bottom of the 6″ piece and the top of the 4″ piece.
- Cut the 4″ MDF to length.
- Apply wood glue to the back of the MDF strip.
- Place the board on the wall and double check that it is placed where you want it (try to make the gap between the 3″ vertical board and this board as small as possible) and THAT IT IS LEVEL.
- Nail the board to the wall using the nail gun.
- Repeat until all of the 4″ horizontal boards are up.
- Now it’s time for a cutting marathon… Add the 3″ vertical pieces between the 6″ and 4″ boards and the 4″ boards and the base board/floor.
- Cut the 3″ MDF to length – for reference, the piece between the bottom of the 6″ horizontal board and the top of the 4″ horizontal board was 13-3/4″ for us. The piece between the bottom of the 4″ horizontal board and the top of our base boards was 36″.
- Apply wood glue to the back of the MDF strip.
- Place the board on the wall and double check that it is placed where you want it and THAT IT IS LEVEL.
- Nail the board to the wall using the nail gun.
- Repeat until all of the 3″ vertical boards are up.
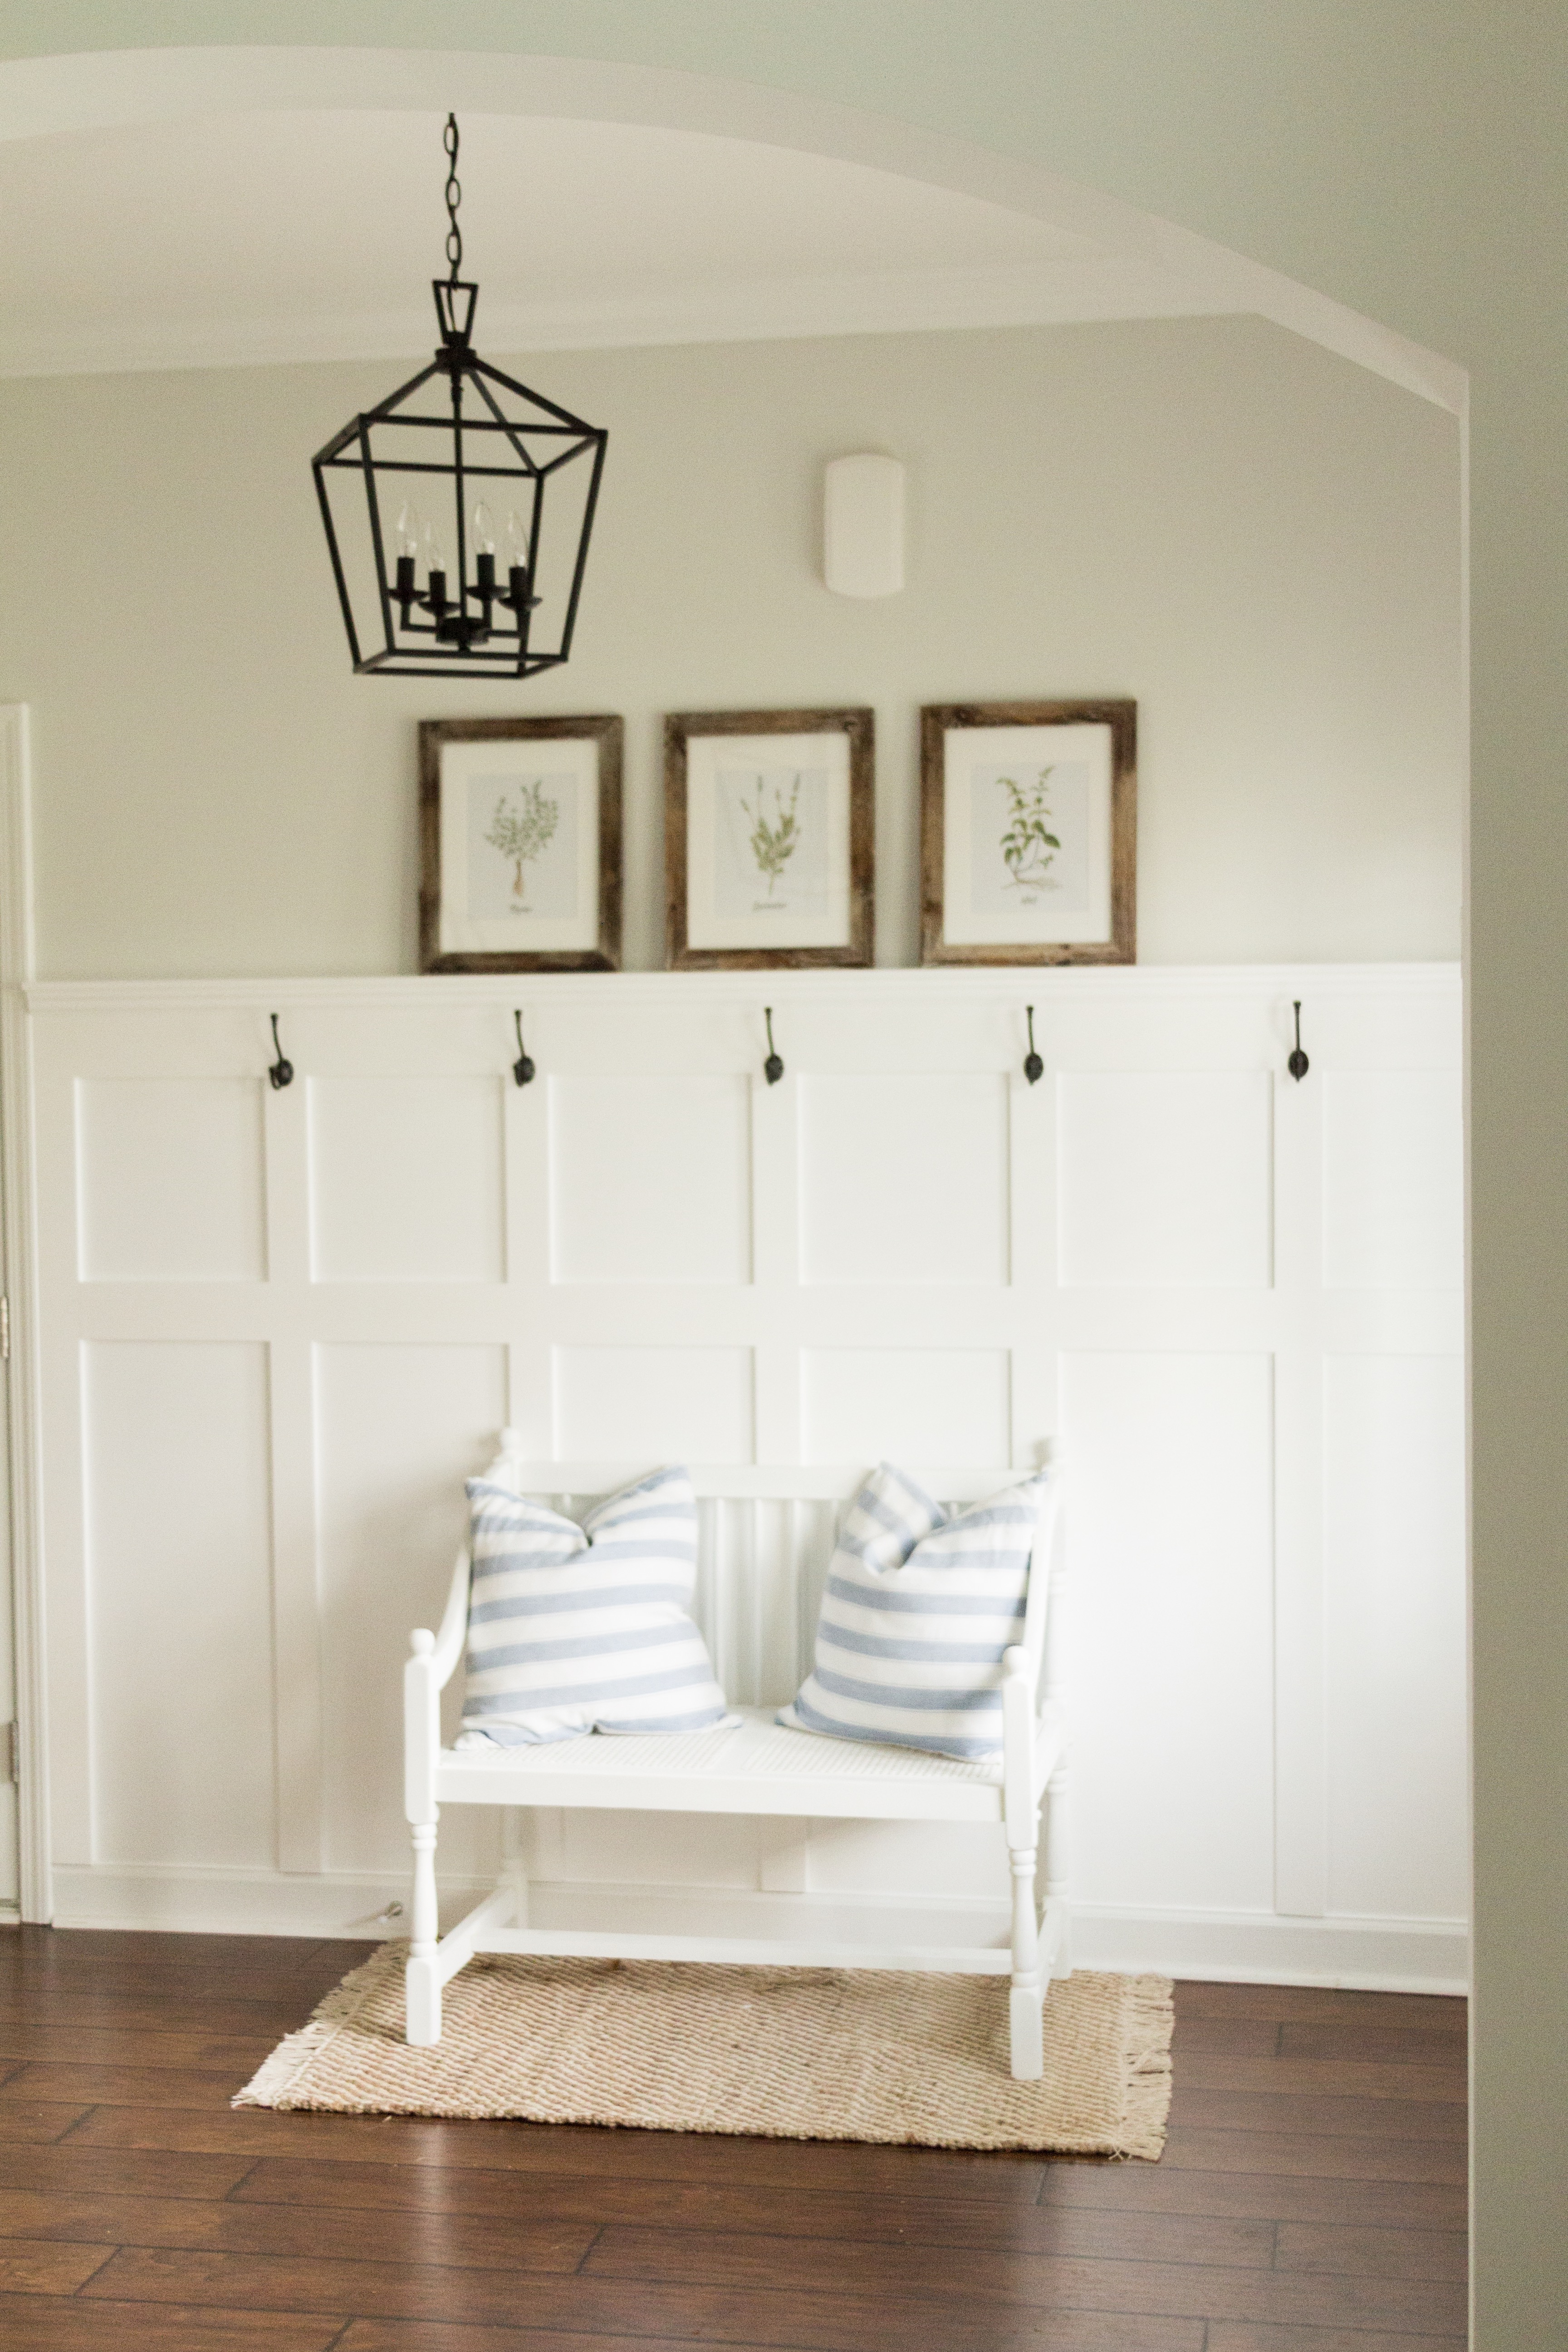
- Add the 2″ “shelf” on top of the 6″ horizontal board.
- Cut the 2″ piece to length.
- Place the 2″ board on top of the 6″ board and double check THAT IT IS LEVEL.
- Nail straight down into the 6″ board.
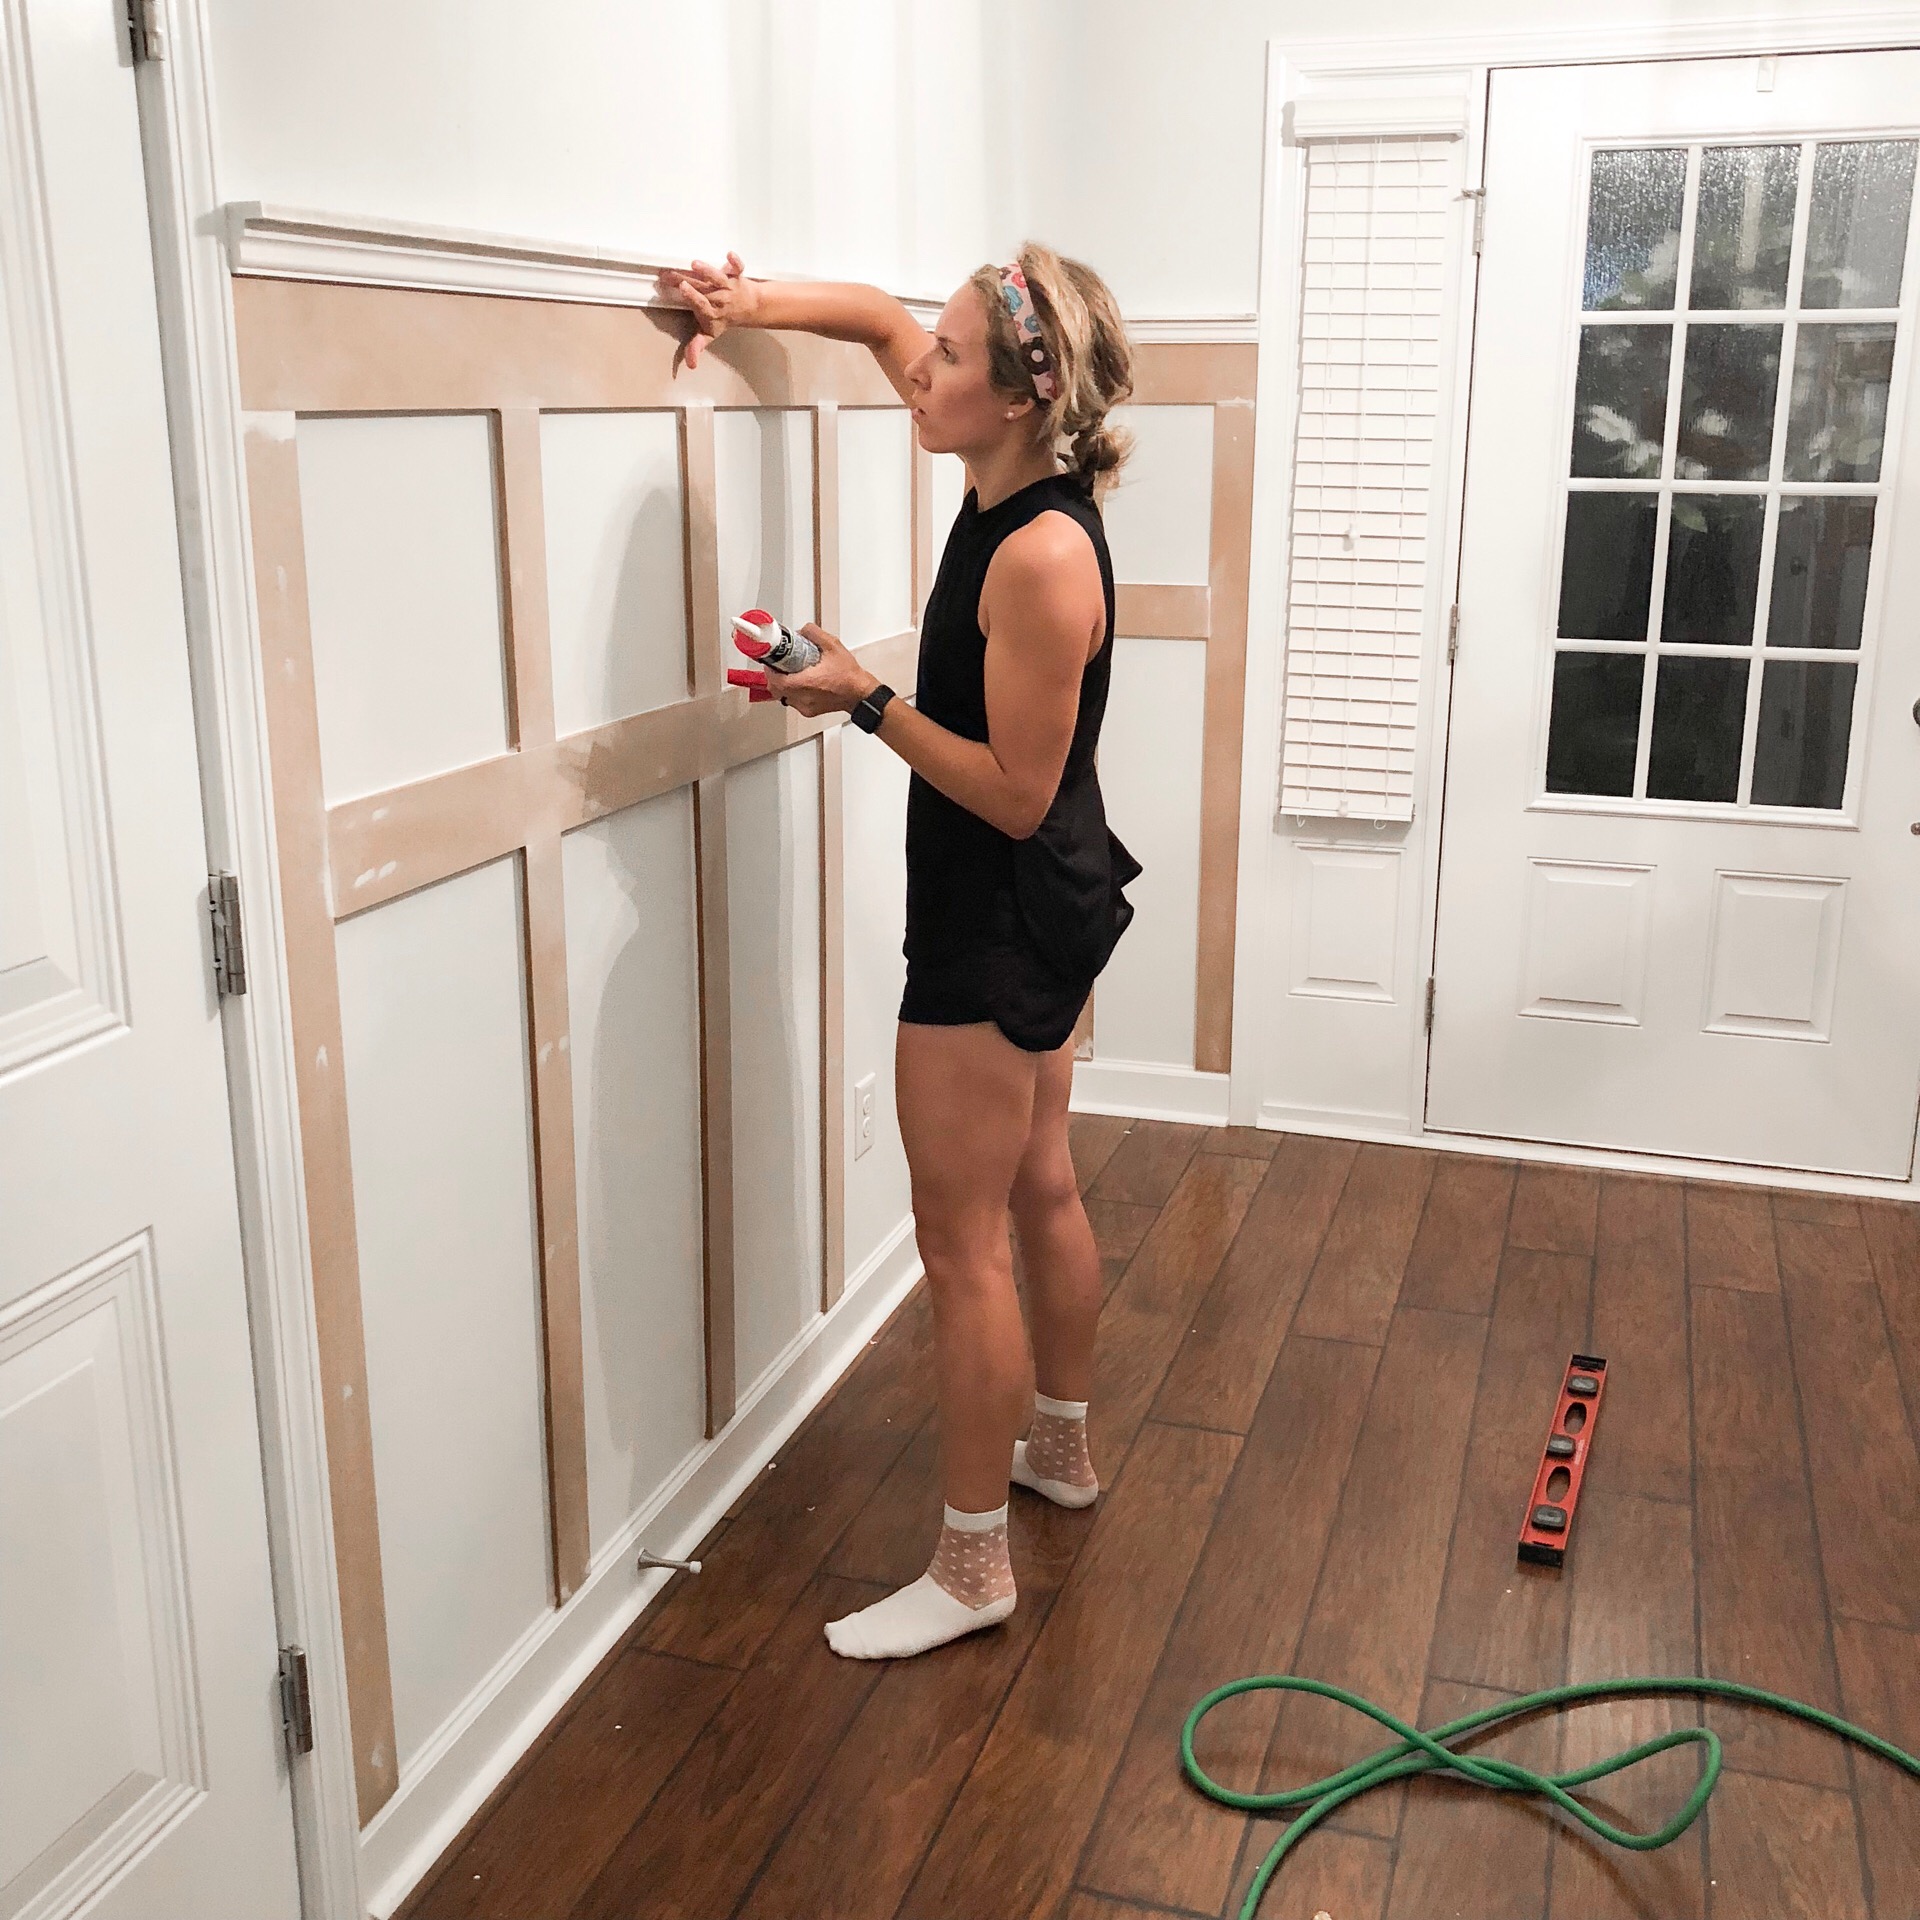
- Add the trim pieces between the 2″ “shelf” and the 6″ horizontal board.
- You should be getting excited by now!!! Fill in all of the nail gun holes with wood filler or DAP DryDex (what I prefer).
- Fill in the gaps between the boards using joint compound or wood filler.
- To make this process so much faster, I filled a few gaps at a time and then would go back to the first one I did and would scrape off the excess putty while it was still damp. This made it so that I barely had to do any sanding the following day.
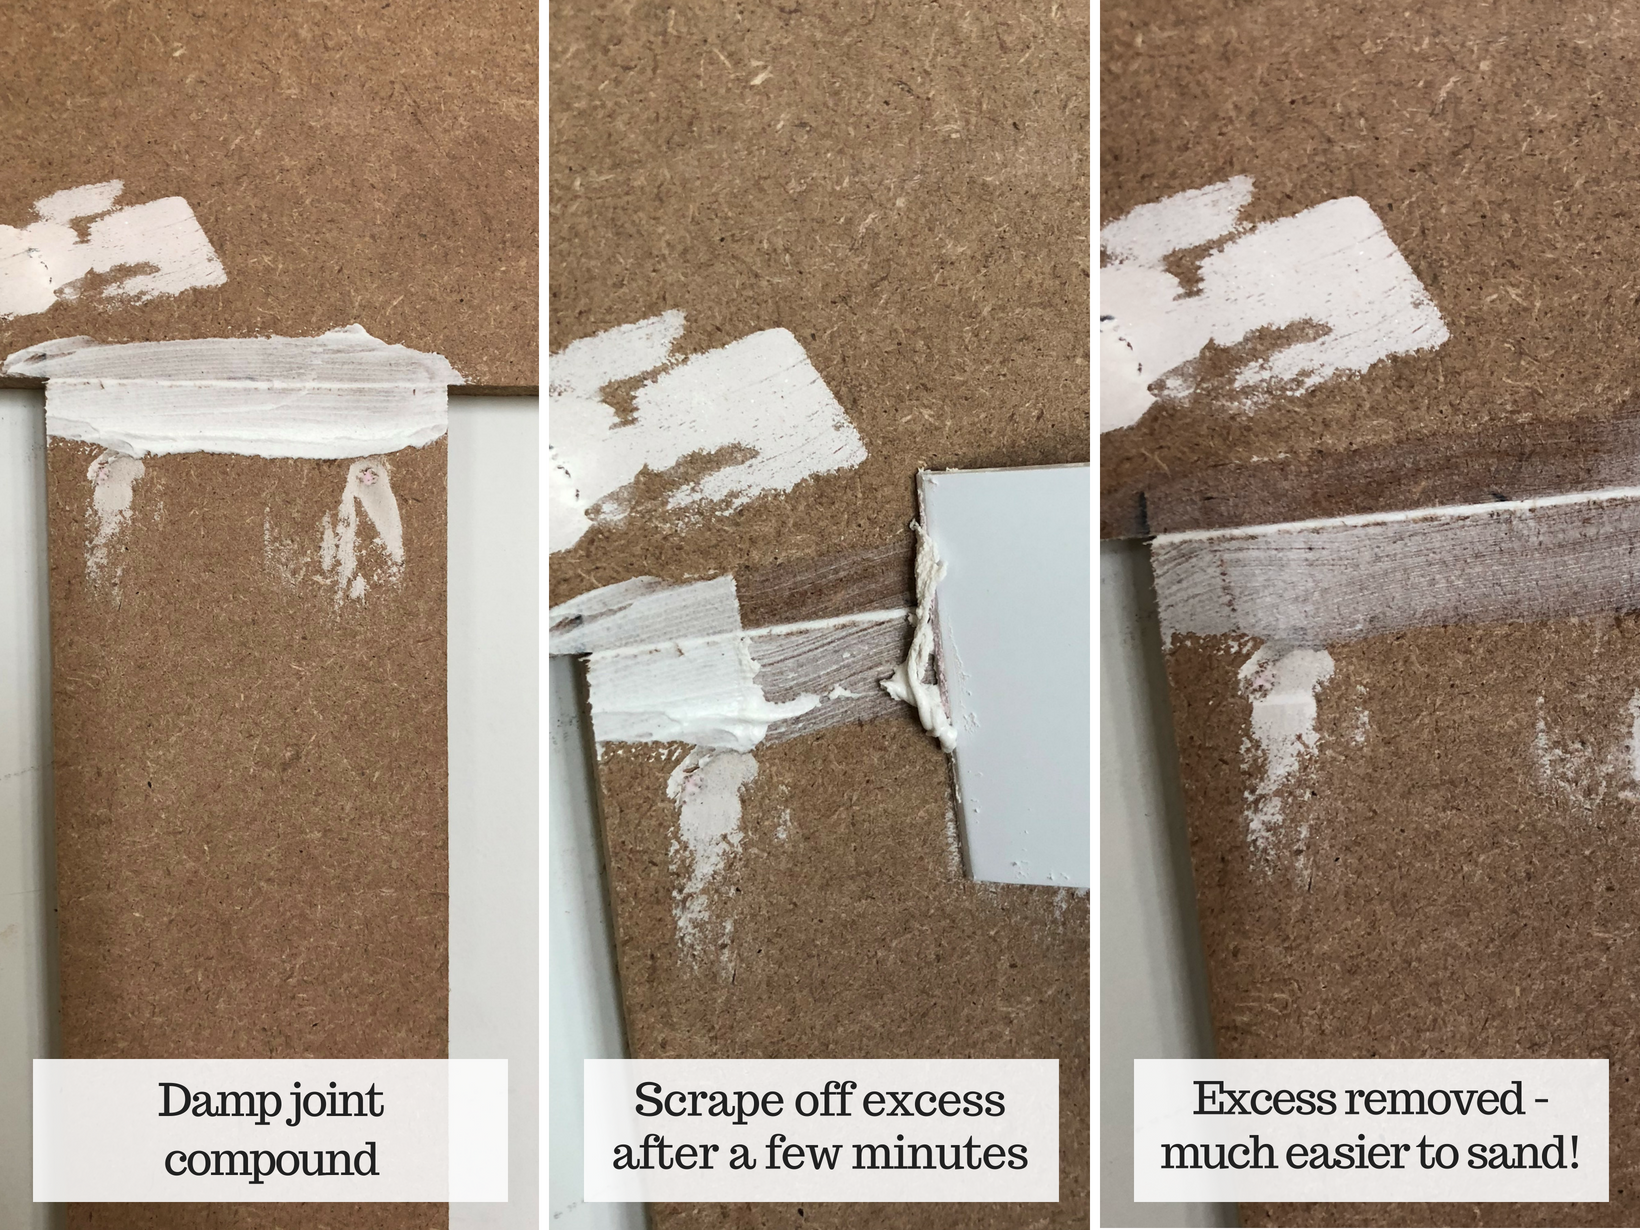
- Sand all of the nail holes and gaps so that it is all seamless.

- Vacuum/wipe down the entire area to remove any dust.
- Caulk all of the edges between the boards and the walls. I wish this wasn’t necessary but I tested it out and it was a no-go. Caulk fills in the shadows so that once everything is painted, you don’t see gaps between the walls and the boards. Let it dry overnight. If you’re painting your board and batten a dark color, this might not be necessary!
- Caulking takes a bit of practice and can get pretty messy quick so there are a few things that can help:
- You can get a handy little tool at the hardware store that makes smoothing caulk lines but easier. I just use my finger. If that’s the case, make sure to keep a clean towel nearby to wipe off any excess caulk that comes off when smoothing the line. You can do it!!!!
- Caulking takes a bit of practice and can get pretty messy quick so there are a few things that can help:
- Tape off the walls so that you don’t get paint in places you don’t want it.
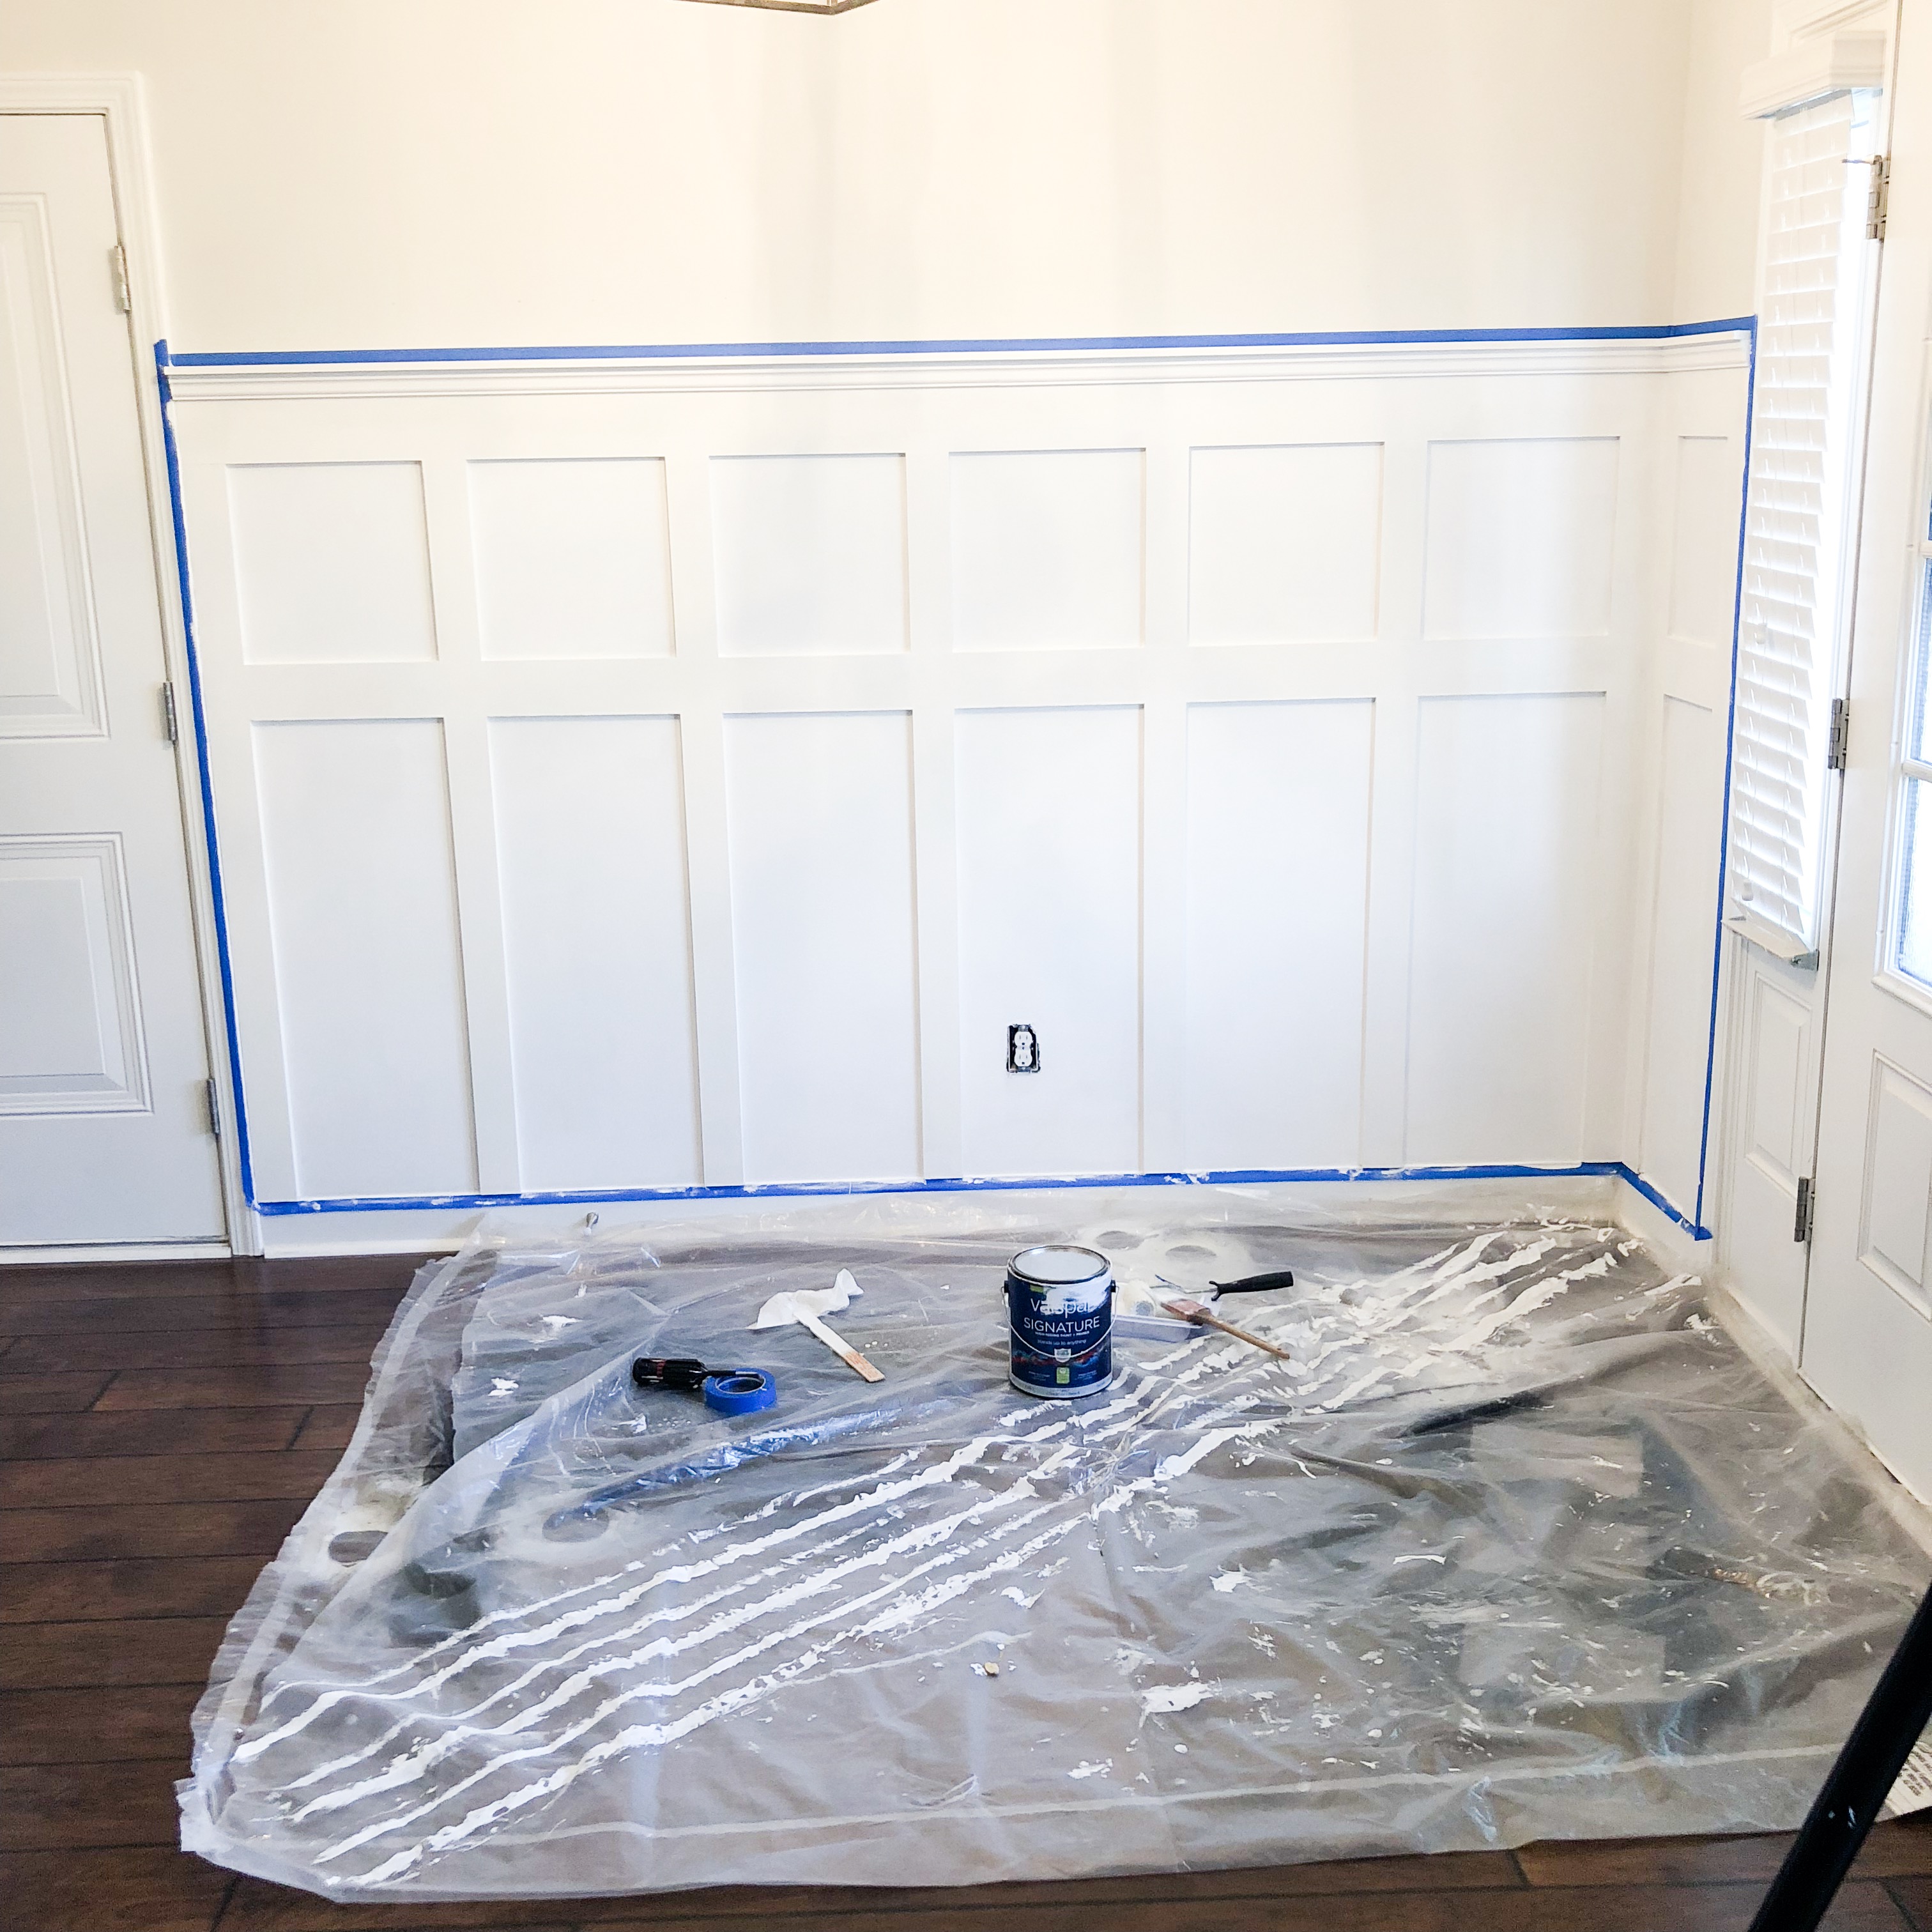
- Paint!!! Our paint had a primer in it but if you’re not using a 2-in-1 type of thing, I would highly suggest priming the area first. It took about 2.5 coats to completely cover everything.
- ENJOY!!!! We hope you love your transformed space as much as we love ours!
FAQs that I’m anticipating:
How did you determine how wide to make the space between the boards?
- We did the math by putting a vertical board on each end of the wall and then determining how many could we fit in between them while liking the way it looked of course. For us, that meant we had 7 vertical boards total on the main wall in our foyer: 2 on the ends and 5 evenly spaced in between them. Like I said, tape off your space first!! I was able to visualize our space with the tape and it helped tremendously.
Did you remove your existing base board trim?
- Nope. We left it as is. Some people remove it so that they can take the board and batten all the way to the ground but we didn’t want to do that.
Since you kept the base boards did you cut the board and batten at an angle or just straight across at the bottom where it met up with the trim?
- We kept it straight across. I’ve seen it cut at a 45 degree angle but I personally don’t like the way that looks as much.
What about weird spaces that are too small to fit an entire board and batten section?
- We had this problem by the door. The spaces on each side are smaller than the width that was between our boards on the full wall with the bench if that makes sense… So we just put a board on each end and let the width between them be what it would be. It’s barely noticeable especially once painted!
What did you do with the spaces that were too small to have any boards at all?
- For those we just added the 4″ horizontal board and no vertical boards. It looks a bit funky before it’s painted but once it’s all the same color it looks great!
How did you know what to fill and what to caulk?
- I filled all nail holes and gaps between boards. I caulked any spaces between the boards and the wall and also caulked the corners so that there weren’t any gaps.
That was a lot of information! Let us know if you have any questions!
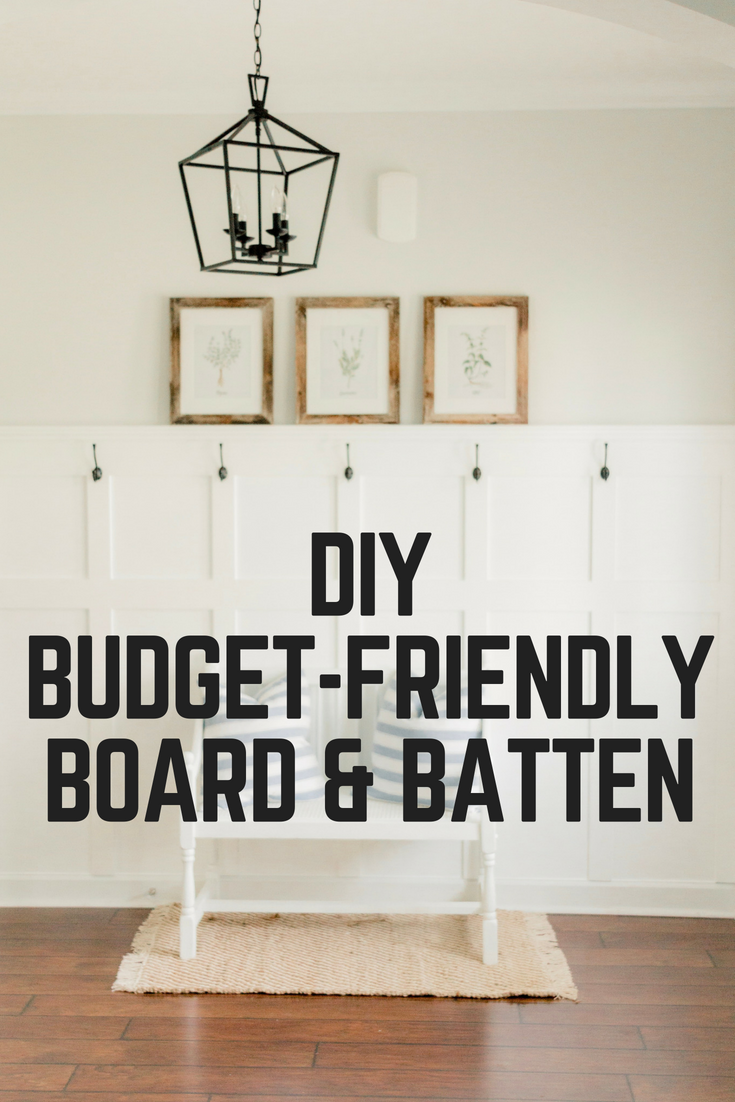
Pin for later:
Other posts you might enjoy:
Farmhouse Entryway Reveal
DIY Farmhouse Custom Door Trim
DIY Window Boxes
jordan jean
Leave a Reply


What length of 18 gauge nail did you use?
I think it was 1.5″
When you say to have Home Depot “strip” the wood.. what exactly does that mean?
We had them rip/cut it down to the width that we wanted for each batten since we didn’t have a table saw at the time. Essentially it was one large piece of MDF that they cut down into strips does that make sense?
Oh got it! Actual strips. I was thinking it had a chemical strip. Thank you!
[…] Source: jordanjean.com […]
Followed your tutorial for the board and batten to a “T” and I LOVE how it’s turned out and what it’s done for our wall! It’s behind a corner banquet bench for a breakfast nook. Would post a pic but it looks exactly like yours, haha:) thanks again.
I’m so glad you love it!! I’m sure it looks so great 🙂
Wondering where you got those beautiful hooks from?
Hi!! The hooks are linked here on this post – https://jordanjean.com/entryway-reveal/
A contractor friend told me that board & baten will make my base.ment look even shorter than the only just under 7’vertical space I have ( floor to ceiling). Is he right? Any tips to help it not appear shirt? Thank you.
I disagree! I think board and batten when done at the correct height for the space can make it feel SO much larger! What I would do is grab some painters tape and tape off the area with varying heights to figure out what you like best in the space. Our ceilings are 8′ and we did board and batten in our entryway and it looks more grand in there. You can find that post here – https://jordanjean.com/mississippi-entryway-makeover/
Hey there!
Did yall put the 2” board on top of the 6” top board? I know & see yall did in one pic but futher down the blog, the 2” board looks like it may be on top of the decorative board….orrr I could be looking at it wrong. It’s beautiful either way! Just curious before I start mine! ☺️
Yep! In the step-by-step tutorial you’ll see that we nailed the 2″ piece into the 6″ and then added the decorative trim piece after that!
How did you put the hooks in I am afraid if I do this without a drywall screw and 0ut a backpack on it the board will fall?
We screwed them directly into the boards. We personally didn’t have any issues with them holding weight!
Can you please share all your measurements? I’m especially interested in the height.
Thank you!
All of the measurements are in the post! 🙂
[…] Source […]
I cannot wait to get to work on this for our new fixer upper. As soon as this is done, all that should be left is a hardwood floor refinishing, Thank you for sharing and making the project a bit simpler for us.
We are trying this soon. Yours is so lovely. Curious as some posts say to prime the mdf with oil primer so the paint does not make it swell with water. I saw you used paint and primer. So no issues with that? You sanded the edges and then placed them in the wall and painted? Was afraid it would ruin the mdf after I read their post.
Hi Tonya! Very interesting! We had 0 issues with that at all in the two years since that project! We don’t live in that house anymore but I talk often with the woman that bought our house and she hasn’t said anything to me about it either.
[…] We shared the tutorial for the black board and batten HERE or you can read about we did this version in the South Carolina home HERE. […]
[…] our South Carolina home, one of the first projects we completed was the board and batten in the entryway. Even though the house was brand spankin’ new and really didn’t need […]
How are your hooks mounted into the MDF? Are they holding up well with hanging things on them?
Just screwed in using the screws that came with them! We use them daily (typically with coats) and they are holding up great!
Very nice! Girls that can DIYs always impresing me! Well done!!?
Thank you!!
Love the paint color above your board/batten, can you share ?
Hi! If you go here https://jordanjean.com/our-home-shaw you’ll find all of the colors and information on our SC home!
Can not find the name of color of paint that you used on top… help!
It’s Sherwin Williams Frosty White. Everything is in detail when you click each room here! https://jordanjean.com/our-home-shaw
Love the floors. where are they from?
Hi Rosie! The floors are Toasted Hickory Laminate. All of the details on our SC are here! https://jordanjean.com/our-home-shaw
Hi! This is GORGEOUS! We are wanting to do something similar in our office. How did you make the vertical boards and the bottom baseboards mesh seamlessly and look so aesthetically pleasing? That’s what we are struggling to figure out because we will also keep our existing baseboards. Thank you and great job!!
Kristie
Hi! Thank you! If I could go back and do this over again I actually would’ve done it differently. I’d cut the bottom of the vertical boards at an angle so they hang slightly over your existing baseboard. The depth of the MDF boards and our baseboards are different so it’s no as seamless as I’d like for it to be! If we had cut the bottoms at an angle it would’ve helped with that!!
Was wondering where u got the bench from? I have a really small entry way and am looking for a small bench.
Hi! We found it at a local thrift shop. Sorry I know that doesn’t help!!!
I have a question about your board and batten project. I noticed in your step-by-step, you first nailed the 2″ shelf into the 6″ horizontal board, but then you put the trim between the two things you just nailed into the 6″ board. So, the trim is between the 2″ and 6″ board. How did that work?
We just nailed that trim piece directly onto the 6″ piece and underneath the 2″ piece. Does that make sense? It just fit right in that right angle we had created.
How many inches are the between the vertical boards? Thanks!
13.5″
How did you combat sanding the MDF and any weird texture that left?
Love the look and am replicating it in our new home during quarantine (like many others!)
Thank you so much!! So kind of you to say. Hmm… Do you mean on the edges? On any rough edges I used a fine grit sanding block to clean them up before we attached the board to the wall. I hope that helps!!
I love how it turned out…I’m starting my entryway this weekend!! What I want to know is, how did you get Home Depot to cut the MDF in specific sizes? I went yesterday, and they absolutely REFUSED to cut anything smaller than 12″. So I guess I have to invest in a table saw!!
Thank you!! I think it depends on your store, unfortunately. :/ I’m so sorry to hear that!
Hi Jordan,
Do your walls have texture? I noticed you didn’t do anything before putting up the boards. I can tell you are a perfectionist and I was fascinated by everything on your blog. Considering this board & batten project…would you shoot for a smooth wall surface or skip this step? I live in California I guess we do texture on walls more than in other states..🤷🏻♀️
Hi Miriam! Thank you so much for your sweet words! We don’t have texture on our walls. At Home Depot/Lowes you can buy thin boards that I’d put up first to make the walls smooth (I’m so sorry I’m blanking on their name!)! Aim to have the large smooth boards line up with the boards you’ll use for the board & batten to cover the seams. That’ll give it a beautiful finish!
When you say you had Home Depot strip them down can you tell me exactly what that means also do your batten boards sit flush on your baseboards or stick out a bit further ? Our base boards have a very thin decorative topping I’m trying to figure out how to make the batten be flush and is there a thinner board to buy for this ? Any help would be greatly appreciated
Since we didn’t have a table saw we had them cut the MDF boards to the width that we were going to use and then we used our miter saw to cut them to length. They don’t sit flush with our baseboards so they do stick out a bit. The next time we do this we’ll be using a material that is the same depth as the baseboard or add a thicker baseboard so they sit flush. They do have thinner boards you can use for it. I’d measure the depth of your baseboard and then search in the store to see if you can find a board that is the same depth. Just beware that when cutting a thinner material there is more chance for warping.
Hi! What size picture frames did you use above the board and batten?
We are currently working on replicating this during quarantine!
11 x 14, matted to 8 x 10!
Hi! I love the look and want to replicate. When you measured and equally spaced the vertical boards on the large wall section with hooks, did it match the spacing shorter wall section?
Yes! The distance is the same between the boards on all of the walls! I hope that helps!
Hi! I love your blog so much; thank you for sharing all that you do! Wondering where your entryway hooks are from? Thank you!
Thank you so much!! They’re linked on this page here – https://jordanjean.com/our-home-shaw
Love this, we are going to attempt this during COVID sequestering! Can you tell me where you purchased your entryway farmhouse looking chandelier? Thanks!
So fun!! https://rstyle.me/+MMwh9MAwu97obUcqH5H3Sg here’s my affiliate link to it!
Hi’!
I absolutely love what you did and can’t wait to try it. But I also wanted to ask what your wall color is, it’s beautiful.
Thanks!
Kristi
Thank you! The walls are SW Frosty White! If you go to this section on the blog, you can find every detail about every room! https://jordanjean.com/our-home-shaw
Oh my gosh, your blog is the best I have read on how to!
I have Wanted to do in my small entryway for so long. So excited to get this done!!
Thank you
That makes me so happy to hear! I’m so glad!
[…] Tuesday! After we completed our board and batten in the foyer, I thought it would be cute to paint the front door to provide a little bit of […]
[…] DIY Board and Batten […]